 by
by Here is a detailed, step-by-step guide to creating your very first crochet bag. This project is designed specifically for absolute beginners, uses the most basic stitches, and can realistically be completed in a single afternoon or a couple of relaxed evenings.
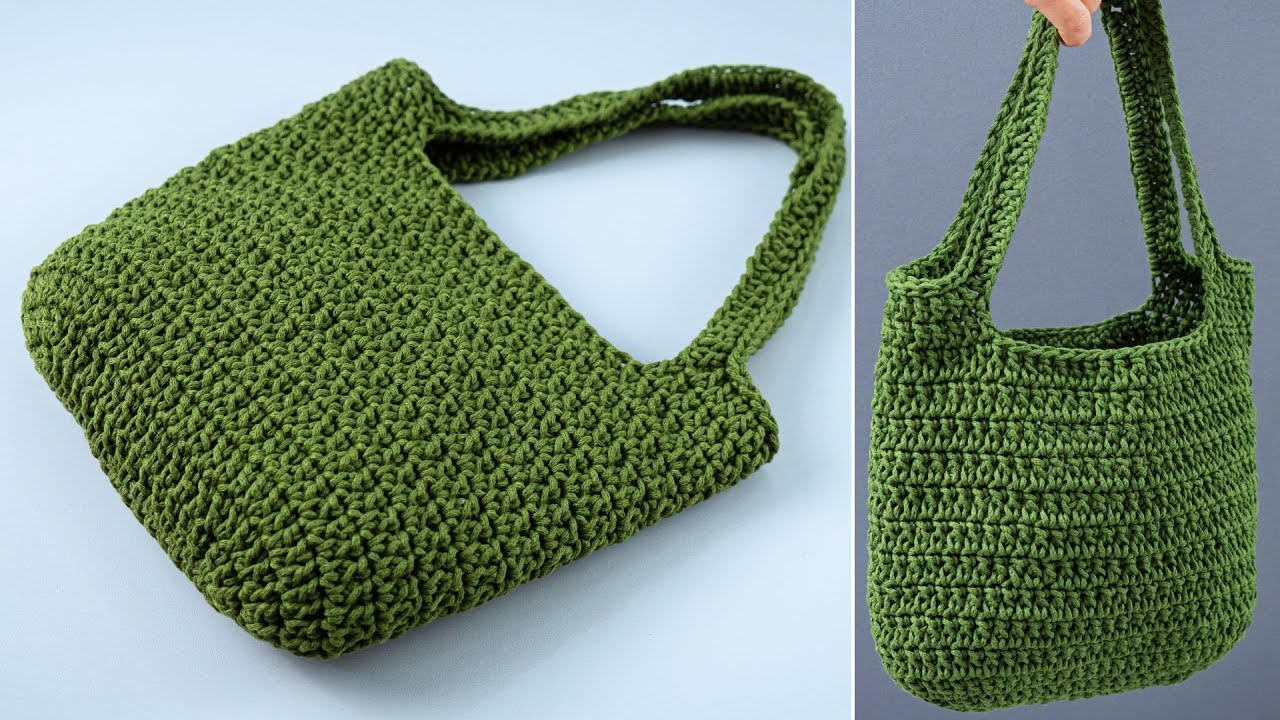
Craft Your First Crochet Bag in an Afternoon: A Beginner’s Step-by-Step Guide
There’s a special kind of magic in creating something beautiful and functional with your own two hands. If you’ve ever wanted to learn to crochet, a simple bag is the perfect first project. It’s rewarding, practical, and teaches you the fundamental skills you’ll need for countless projects to come.
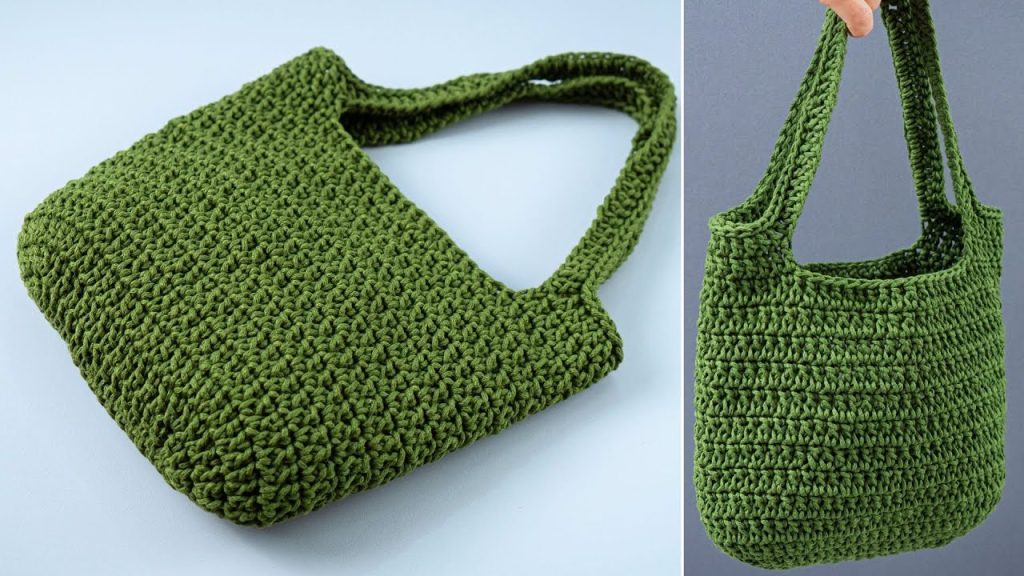
This guide will walk you through every single step, from choosing your materials to weaving in the final end. We’ll be making a chic, minimalist tote-style bag constructed from a simple rectangle. No complicated shaping, no confusing increases or decreases—just pure, relaxing crochet.
Let’s get started!
Part 1: Your Essential Toolkit (Materials & Tools)
Before you can start, you’ll need to gather a few supplies. The right tools will make the process much smoother and more enjoyable.
- Yarn: The star of the show! For a sturdy beginner bag, a worsted weight (Category 4) yarn is ideal. Look for cotton or a cotton-acrylic blend, as these materials are durable, have less stretch than pure wool, and are easy to work with. You will need approximately 250-300 yards (about 230-275 meters). This is usually one large skein or two smaller ones. Choose a light or medium color for your first project, as it makes it much easier to see your stitches.
- Crochet Hook: The size of your hook should correspond to your yarn weight. For worsted weight yarn, a 5.0mm (H-8) or 5.5mm (I-9) hook is a great choice. The yarn label will often suggest a recommended hook size.
- Scissors: Any pair of scissors will do for snipping your yarn.
- Yarn Needle (or Tapestry Needle): This is a large, blunt-tipped needle with a big eye. It’s absolutely essential for sewing the sides of your bag and weaving in your loose yarn ends for a clean, professional finish.
- Stitch Markers (Optional but Highly Recommended): These small plastic clips are a beginner’s best friend. They help you mark important stitches, like the first and last stitch of a row, so you don’t lose your place. You can also use a bobby pin or a small piece of contrasting yarn.
Part 2: Mastering the Basic Stitches
This entire bag is made using just two fundamental crochet techniques. Practice these a few times before you begin the project.
1. The Slip Knot & Chain (ch)
This is how every crochet project begins.
- Slip Knot: This creates the first loop on your hook.
- Chain (ch): This is the foundation of your project.
- Start with a slip knot on your hook.
- Use the hook to grab the yarn from the back (this is called a “yarn over”).
- Pull that yarn through the loop that’s already on your hook.
- Congratulations, you’ve made one chain! Repeat to create a foundation chain.
2. The Single Crochet (sc)
This is the only stitch you’ll need to make the body of the bag. It creates a dense, sturdy fabric that’s perfect for a bag that needs to hold its shape.
- Insert your hook into the desired stitch.
- Yarn over.
- Pull the yarn back through the stitch. You will now have two loops on your hook.
- Yarn over again.
- Pull the yarn through both loops on your hook.
- That’s a complete single crochet stitch!
Part 3: The Pattern – Let’s Get Crocheting!
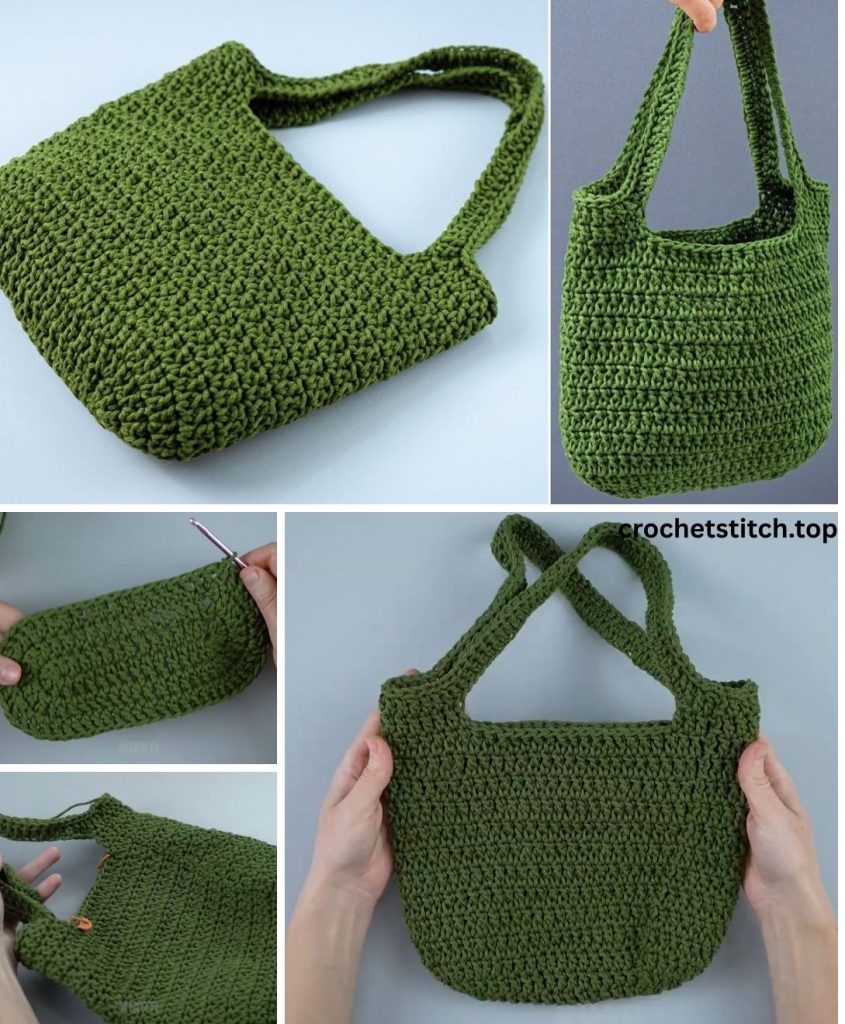
We will create one large rectangle, which we will then fold and seam to form the bag.
The Bag Body (The Big Rectangle)
Foundation Chain: Start by making a slip knot and placing it on your hook. Chain 41.
- Designer’s Note: This will create a bag that is approximately 12-13 inches wide. If you want a wider or narrower bag, simply change the number of starting chains. Any number will work! The final width will be slightly less than the length of your starting chain.
Row 1:
- Locate the second chain from your hook (do not count the loop on the hook itself).
- Insert your hook into this second chain.
- Make one single crochet (sc) stitch.
- Place a stitch marker in the top of this first stitch you just made. This helps you find the end of the row when you come back.
- Proceed to make one single crochet stitch in every single chain across the foundation chain.
- When you reach the end, you should have a total of 40 single crochet stitches. Count them to be sure!
Row 2:
- Chain 1. This is your “turning chain.” It brings your yarn up to the correct height for the next row of single crochet stitches. It does not count as a stitch itself.
- Turn your work so you are looking at the reverse side.
- Make one single crochet in the very first stitch (the last one you made in the previous row). Move your stitch marker up to this new first stitch.
- Continue making one single crochet in each stitch across the entire row.
- When you get to the end, make sure you work your final stitch into the stitch you marked from the previous row. This is the key to keeping your edges straight!
- You should still have 40 stitches.
Rows 3 and Beyond: Repeat Row 2 over and over again. That’s it!
- Chain 1, turn your work.
- Single crochet in each stitch across.
Continue repeating this pattern until your rectangle is the desired height. A good dimension for a tote bag is about 28-30 inches (71-76 cm) long. This will create a finished bag that is about 14-15 inches deep when folded. Don’t worry about the exact number of rows; just focus on the measurement.
Finishing the Panel: Once your rectangle reaches the desired length, cut your yarn, leaving a very long tail—about 20-25 inches (50-60 cm). You’ll use this tail for sewing. Now, yarn over and pull the entire tail through the loop on your hook to fasten it off.
Part 4: Assembly – Turning a Rectangle into a Bag
This is where the magic happens!
- Lay it Flat: Place your finished rectangle on a flat surface.
- Fold it: Fold the rectangle in half width-wise, bringing the short starting edge up to meet the short finishing edge. Your long seaming tail should be at one of the top corners.
- Thread your Needle: Thread the long yarn tail onto your yarn needle.
- Seam the First Side: You will now sew the side of the bag together. The easiest and cleanest method is the whip stitch. Simply insert your needle through the loops of both layers of fabric, from front to back, and pull the yarn through. Repeat this, working your way down the entire side, making small, even stitches. Make sure your stitches are firm but not so tight that they pucker the fabric. When you reach the bottom corner, tie a secure knot and weave the remaining end into the seam to hide it.
- Seam the Second Side: Cut a new, long piece of yarn. Attach it securely with a knot at the top corner of the other side of the bag. Seam this side in the same way you did the first.
- Turn it Right-Side Out: Once both sides are seamed, turn your bag right-side out. Admire your work! You now have the body of a bag.
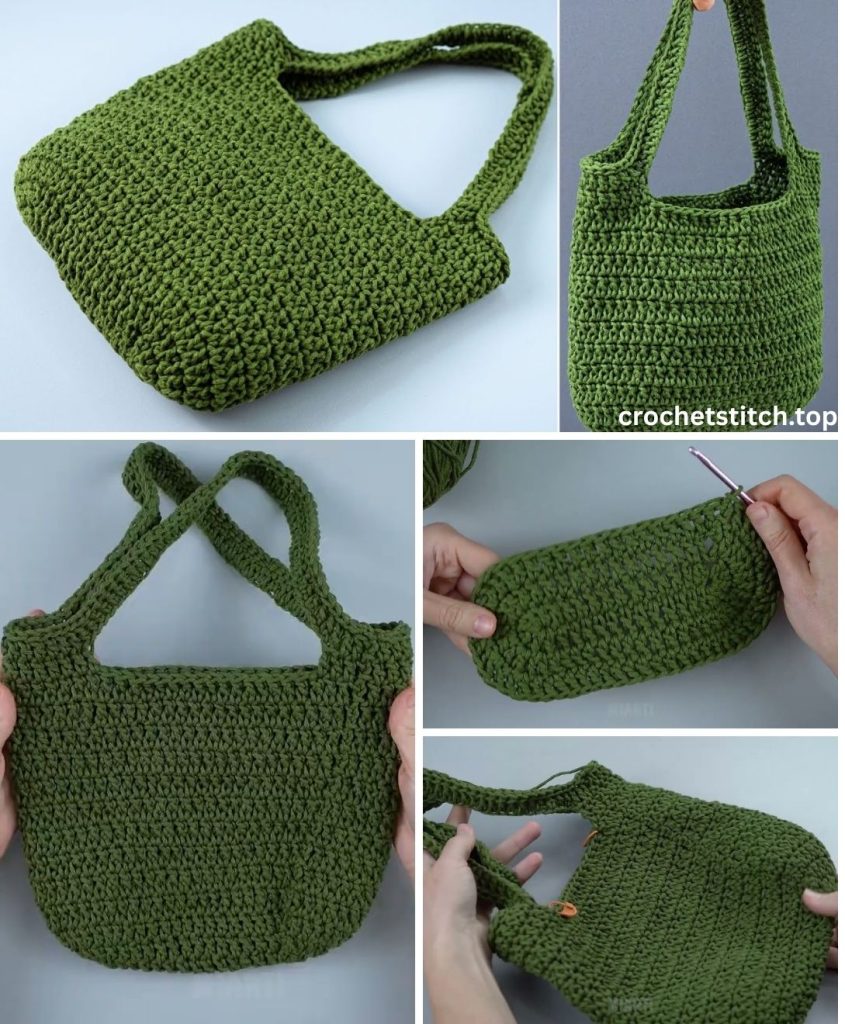
Part 5: Creating and Attaching the Straps
A bag isn’t a bag without straps! Here’s a simple and strong way to make them. You will make two identical straps.
For each strap:
- Leave a long starting tail (about 10 inches) and make a slip knot.
- Chain 71 (or chain until the strap is your desired length).
- Row 1: Single crochet in the second chain from the hook and in each chain across (you’ll have 70 sc).
- Row 2-4: Chain 1, turn. Single crochet in each stitch across (70 sc).
- You can make the strap wider by adding more rows if you like, but 3-4 rows is a great starting point.
- Fasten off, leaving another long tail (10 inches) for sewing.
Attaching the Straps:
- Lay your bag flat. Decide where you want your straps to be placed. A good placement is usually 2-3 inches in from each side seam.
- Take one strap. Place one end on the inside of the bag, about 1-1.5 inches down from the top edge.
- Using the yarn tail and your yarn needle, sew the strap securely to the bag. For maximum strength, sew it on in a square shape, and then stitch a diagonal ‘X’ inside the square for reinforcement.
- Attach the other end of the same strap to the same side of the bag, maintaining the 2-3 inch distance from the other seam.
- Flip the bag over and attach the second strap in the exact same position on the other side.
Part 6: Finishing Touches & Customization
You’re almost done! The final step is crucial for a polished look.
- Weave in Your Ends: Any remaining yarn tails (from joining yarn or attaching straps) should be threaded onto your yarn needle and woven back and forth through the inside stitches of your bag before being snipped short. This prevents your hard work from unraveling.
Ideas for Customization:
- Stripes: Simply switch to a different color of yarn at the end of a row to create beautiful stripes.
- Add a Tassel: Make a simple yarn tassel and attach it to one of the strap bases for a bohemian flair.
- Add a Button: Sew a large, decorative button to the front of the bag and create a simple chain loop on the other side to act as a closure.
- Felted Lining (No-Sew): Cut a piece of craft felt to the inner dimensions of your bag and simply slip it inside for a quick and easy lining.
Congratulations! You have successfully crocheted your very own bag. Be proud of what you’ve created, and get ready for a flood of compliments—and the inevitable question, “Where did you get that?”