 by
by Here is a detailed, step-by-step guide to crocheting your own Granny Square Bucket Hat. This article is designed to be comprehensive, perfect for both adventurous beginners and intermediate crocheters.
How to Crochet a Granny Square Bucket Hat: A Detailed Step-by-Step Guide
The granny square bucket hat is a timeless, bohemian-chic accessory that has surged in popularity. It’s a fantastic project for using up scrap yarn, expressing your personal style through color, and creating a functional, fashionable piece. This detailed guide will walk you through every step of the process, from choosing your materials to weaving in the final end.
Before You Begin: The Essentials
Let’s gather our supplies and review the basic skills needed for this project.
Required Skills
This pattern is very approachable, but you should be comfortable with the following basic crochet stitches (US terminology):
- Magic Ring (MR): A technique to start crocheting in the round without a hole in the center.
- Chain (ch): The foundation of most crochet projects.
- Slip Stitch (sl st): Used to join rounds and move yarn without adding height.
- Double Crochet (dc): The primary stitch used in classic granny squares.
- Weaving in ends: The final step to secure your work.
Materials and Tools
- Yarn: Worsted weight (Category 4) yarn is ideal. Cotton yarn is highly recommended as it provides great structure and breathability, perfect for a hat. You’ll need at least three different colors for a classic look, but the possibilities are endless!
- Color A: For the center of the squares.
- Color B: For the middle round of the squares.
- Color C: For the final round of the squares and for joining/the main hat body.
- Crochet Hook: A 5.00 mm (H-8) hook is a good starting point for worsted weight yarn. Adjust your hook size if needed to meet the gauge or your personal tension.
- Scissors: For cutting yarn.
- Tapestry Needle (or Yarn Needle): Essential for weaving in all the yarn ends for a clean finish.
- Stitch Markers (Optional): Helpful for marking the beginning of a round.
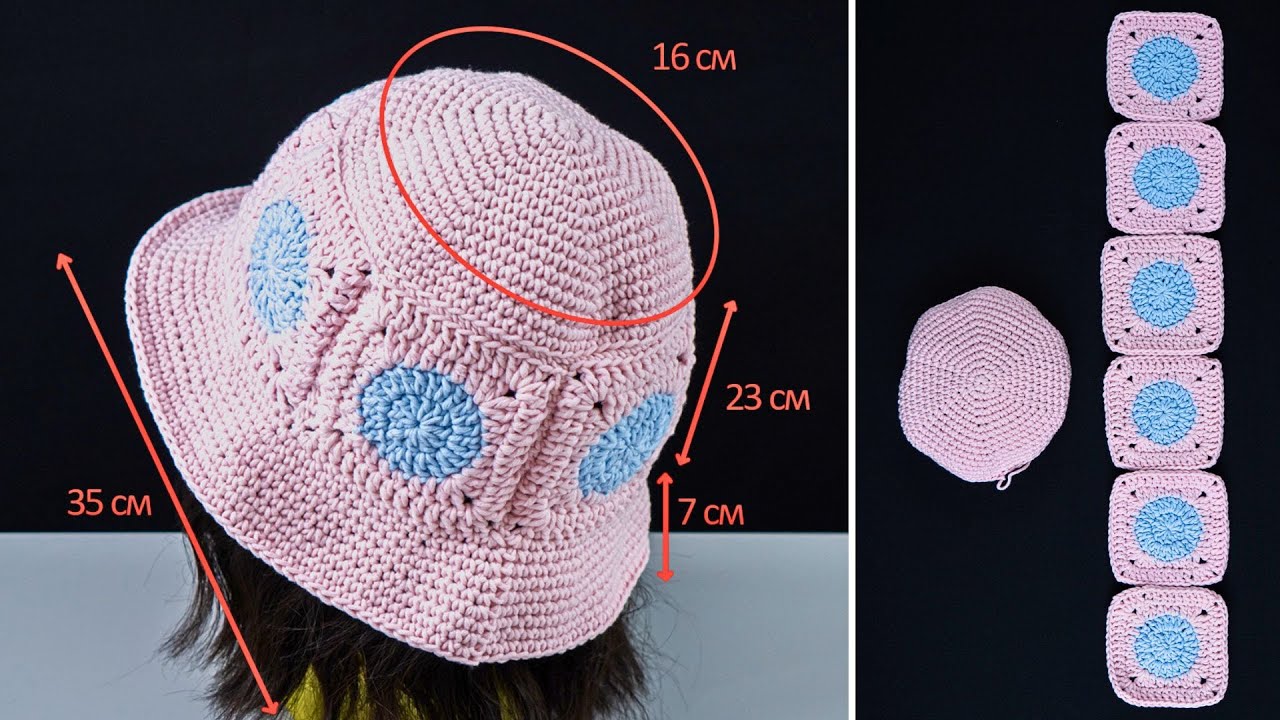
Understanding the Hat’s Construction
A granny square bucket hat is built in three main parts:
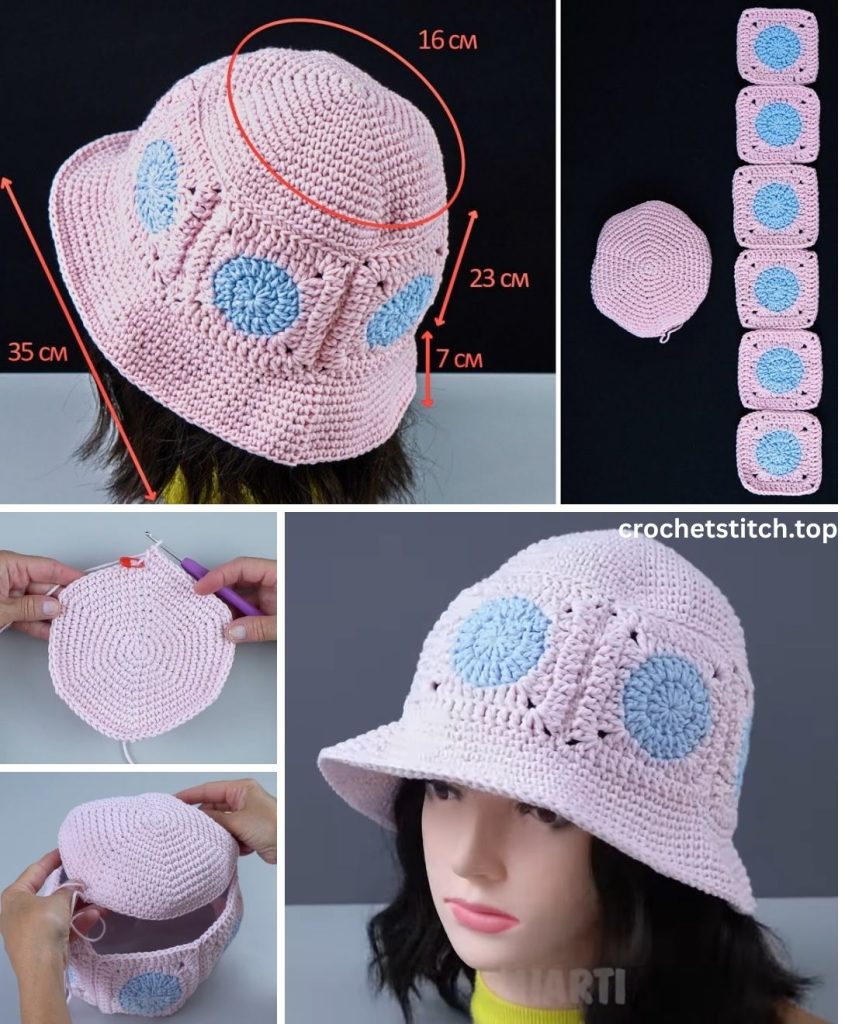
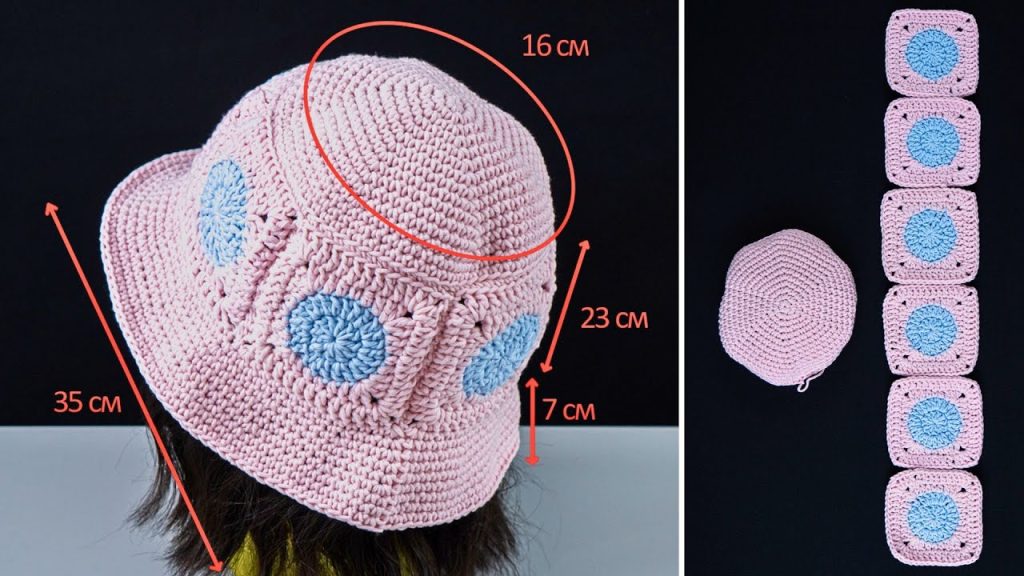
- The Crown: The flat top part of the hat. We will create this by making five identical granny squares and stitching them together into a cross shape.
- The Sides: The vertical body of the hat. This is worked in rounds, attached directly to the assembled crown.
- The Brim: The flared edge of the hat, created by using increase stitches to make the fabric fan out.
Part 1: Crocheting the Granny Squares (Make 5)
We will start by making the five squares that will form the crown of the hat. Each square has three rounds.
Abbreviations:
- ch: chain
- sl st: slip stitch
- dc: double crochet
- sp: space
- st(s): stitch(es)
- […]: repeat instructions within brackets as directed
Classic 3-Round Granny Square Pattern
Round 1 (Color A):
- Start with a magic ring.
- Ch 3 (this counts as your first dc).
- Work 2 dc into the magic ring.
- Ch 2. This creates your first corner space.
- [Work 3 dc into the ring, then ch 2]. Repeat this two more times.
- You should have four clusters of 3 dc, each separated by a ch-2 space.
- Pull the tail to tighten the magic ring.
- Join with a sl st to the top of the initial ch-3. Fasten off Color A.
End of Round 1: 4 clusters of 3-dc, 4 ch-2 corner spaces.
Round 2 (Color B):
- Attach Color B with a slip stitch in any ch-2 corner space.
- Ch 3 (counts as first dc).
- In the same corner space, work (2 dc, ch 2, 3 dc). This is your first corner of the new round.
- [In the next ch-2 corner space, work (3 dc, ch 2, 3 dc)]. Repeat this in the remaining two corner spaces.
- Join with a sl st to the top of the initial ch-3. Fasten off Color B.
End of Round 2: 8 clusters of 3-dc, 4 ch-2 corner spaces.
Round 3 (Color C):
- Attach Color C with a slip stitch in any ch-2 corner space.
- Ch 3 (counts as first dc).
- In the same corner space, work (2 dc, ch 2, 3 dc). This is your first corner.
- Work 3 dc in the space between the next two clusters from the previous round.
- [In the next ch-2 corner space, work (3 dc, ch 2, 3 dc). Then, work 3 dc in the next side space]. Repeat this around the square.
- Join with a sl st to the top of the initial ch-3. Fasten off, leaving a long tail (about 12 inches) for sewing on only one of the squares. For the other four, you can weave in the ends as normal.
End of Round 3: 12 clusters of 3-dc, 4 ch-2 corner spaces.
Pro-Tip: To keep your squares flat and neat, consider blocking them before assembly. Pin them to a foam mat, spray lightly with water, and let them dry completely.
Part 2: Assembling the Crown
Now it’s time to join our five squares to form the top of the hat. The layout will be a cross shape: one square in the center and one on each of its four sides.
- Layout: Place one square in the center (this is the top). Arrange the other four squares around it, one on each side.
- Joining Method: We will use the whip stitch for a clean, flat seam. Thread the long tail you left on one of your squares onto your tapestry needle.
- Join Square 1 to Center: Place one side square on top of the center square, with right sides facing each other. Line up the stitches along one edge.
- Sewing: Insert your needle under the back loops only of both squares. This creates a less bulky seam. Whip stitch across the entire edge, from one corner space to the other. Secure the end, but don’t cut the yarn yet if you can use it to continue joining.
- Continue Joining: Unfold the two squares you just joined. Now place a second side square on top of the center square, right sides together, and whip stitch it to an adjacent side of the center square.
- Repeat this process for the remaining two side squares. You will now have a cross shape.
- Joining the Side Seams: The final step is to join the sides of the cross to form a shallow, boxy shape. Fold the project so that the adjacent sides of the outer squares meet. Whip stitch these four seams together.
You should now have a five-sided, cap-like shape that will sit perfectly on the crown of your head.
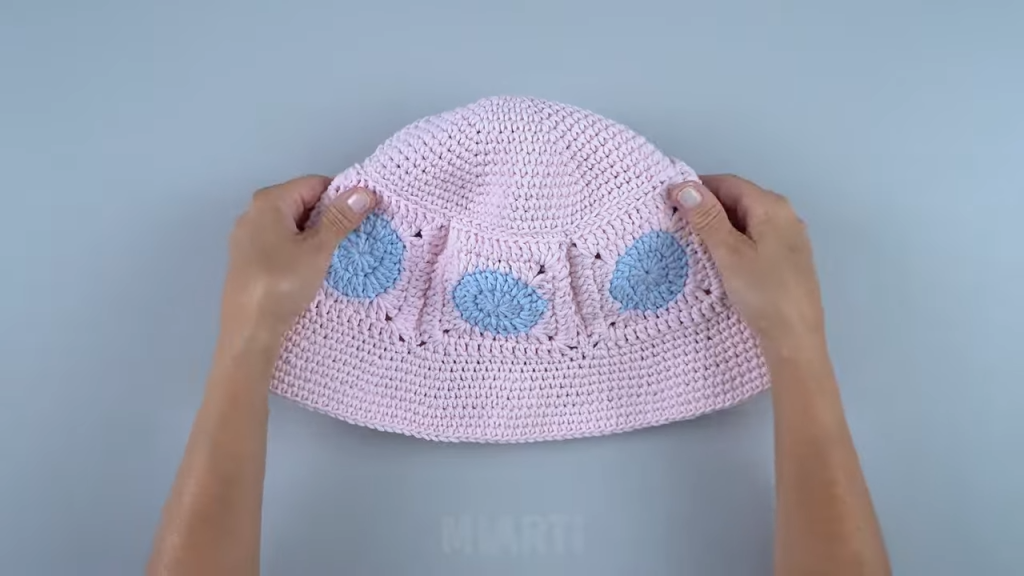
Part 3: Crocheting the Sides of the Hat
With the crown assembled, we’ll now work in continuous rounds to build the height of the hat.
Round 1: The Foundation Round
- Attach Color C with a slip stitch to any stitch along the bottom edge of your assembled crown.
- Ch 3 (counts as first dc).
- Work 1 dc in each stitch and 1 dc in each ch-1 space (from where you seamed the corners) around the entire bottom edge of the crown. The key is to be consistent. Your goal is to have a stitch count that is a multiple of 3. (A common count is around 72 stitches, but it depends on your tension).
- Join with a sl st to the top of the initial ch-3.
Round 2: The Granny Stitch Round
- Ch 3 (counts as first dc).
- Work 2 dc in the same stitch. This is your first “granny cluster.”
- Skip the next 2 stitches.
- [Work 3 dc in the next stitch. Skip the next 2 stitches]. Repeat this pattern all the way around.
- Join with a sl st to the top of the initial ch-3.
Rounds 3-6 (or until desired depth):
- Sl st into the first space between the granny clusters from the previous round.
- Ch 3 (counts as first dc). Work 2 dc in that same space.
- [Work 3 dc in the next space between clusters]. Repeat this pattern all the way around.
- Join with a sl st to the top of the initial ch-3.
Repeat this round until the hat is deep enough. It should sit just above your eyebrows when you try it on. This is typically 4-6 rounds of the granny stitch.
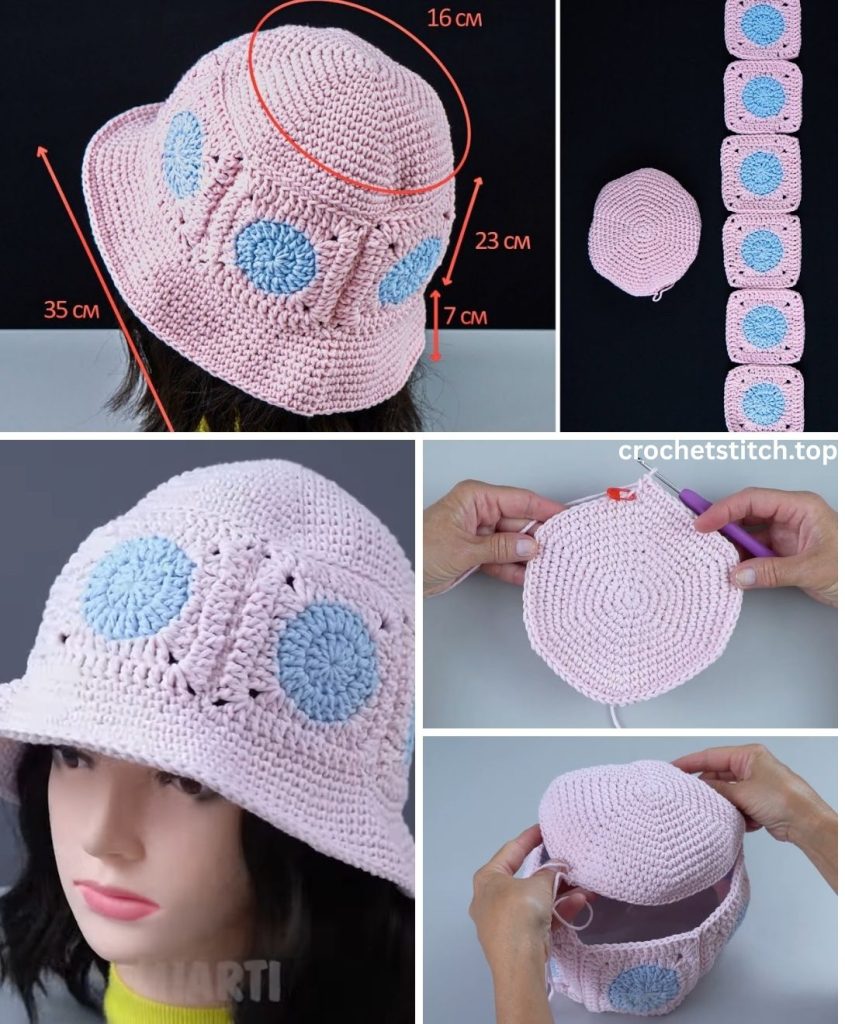
Part 4: Crocheting the Brim
The brim is created by increasing the number of stitches in each round, causing the fabric to flare outwards.
Round 1 of Brim (Increase Round):
- Sl st into the first space between clusters.
- Ch 3 (counts as first dc). Work 2 dc in the same space.
- Work 3 dc in the next space.
- Increase: In the next space, work two granny clusters. That is (3 dc, ch 1, 3 dc) all in the same space.
- [Work 3 dc in each of the next 2 spaces. Then work an increase (3 dc, ch 1, 3 dc) in the following space]. Repeat this pattern around.
- Join with a sl st to the top of the initial ch-3.
Round 2 of Brim (Even Round):
- Sl st into the next space.
- Ch 3, work 2 dc in the same space.
- Work one 3-dc cluster in each space around, including the ch-1 spaces created by the increases in the previous round.
- Join with a sl st to the top of the initial ch-3.
Round 3 of Brim (Increase Round):
- This time, we will stagger our increases.
- Sl st into the next space. Ch 3, 2 dc in same space.
- Work 3 dc in each of the next 3 spaces.
- In the next space, work an increase (3 dc, ch 1, 3 dc).
- [Work 3 dc in each of the next 4 spaces. Then work an increase in the following space]. Repeat this pattern around.
- Join with a sl st to the top of the initial ch-3.
Round 4 and Onwards: Continue this pattern, alternating one “even” round (no increases) with one “increase” round. In each increase round, add one more regular cluster between the increases (e.g., increase, 5 clusters, increase, 5 clusters…). Continue until the brim is your desired width. A typical brim has 4-6 rounds.
Final Finishing Round: For a clean edge, you can add one final round of single crochet (sc) or slip stitches all the way around the brim. This will help it keep its shape.
Part 5: Finishing Touches
You’re almost there! The final step is to make your hat look polished and professional.
- Fasten Off: Cut your yarn, leaving a 6-inch tail. Yarn over and pull the tail all the way through the loop on your hook to create a secure knot.
- Weave In Ends: Thread the tail onto your tapestry needle. Weave the needle in and out of the stitches on the wrong side of your hat for at least a few inches. Change direction once or twice to make sure it’s extra secure. Snip any remaining yarn.
- Repeat: Do this for ALL remaining yarn ends. This is the most crucial step for durability!
Congratulations! You have now completed your very own crochet granny square bucket hat. Wear it with pride, knowing you made it stitch by stitch. Experiment with colors and yarn to create a whole collection!