 by
by Of course! Here is a detailed, step-by-step guide to crocheting an easy Corner to Corner (C2C) square with a lovely white and brown design. This article is designed for beginners who are comfortable with basic stitches and want to tackle a beautiful, graphic project.
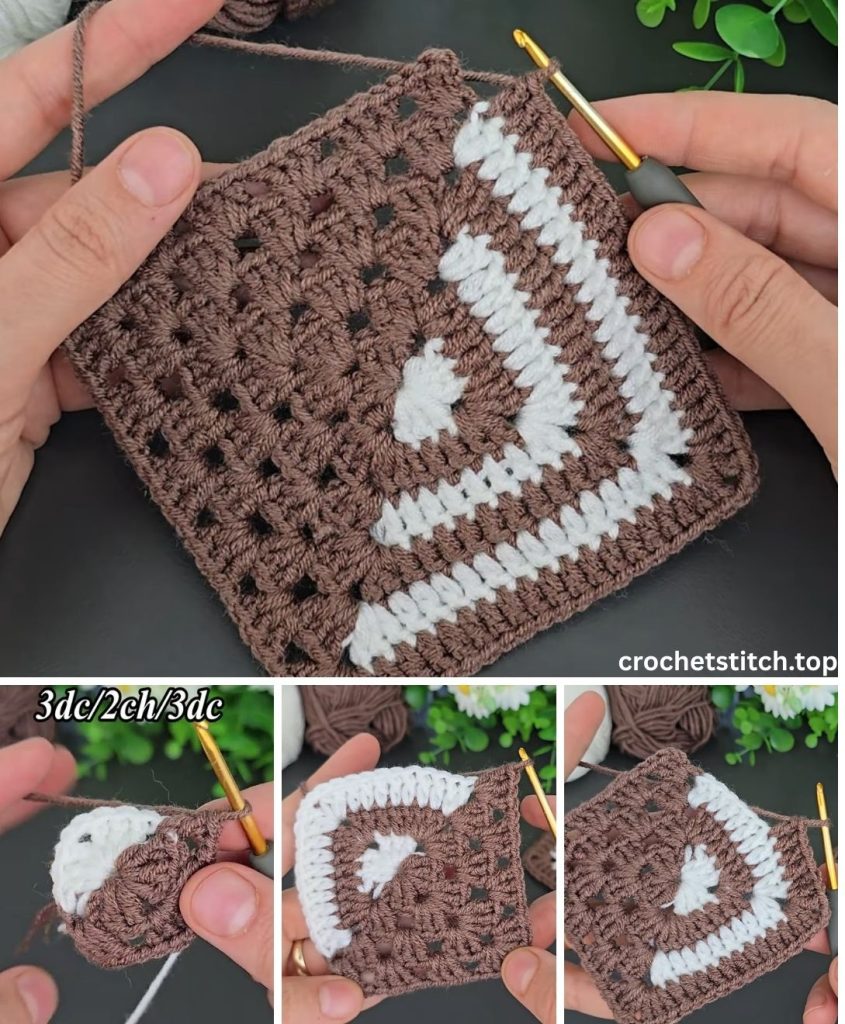
A Cozy Creation: Your Step-by-Step Guide to the Easiest Corner to Corner Crochet Square
Welcome to the wonderfully addictive world of Corner to Corner (C2C) crochet! If you’ve ever admired those beautiful “pixelated” blankets and wondered how they were made, you’re in the right place. The C2C technique is surprisingly simple, building your project on a diagonal grid using small “tiles” or “blocks.” It’s a rhythmic and meditative process that allows for incredible colorwork with minimal fuss.
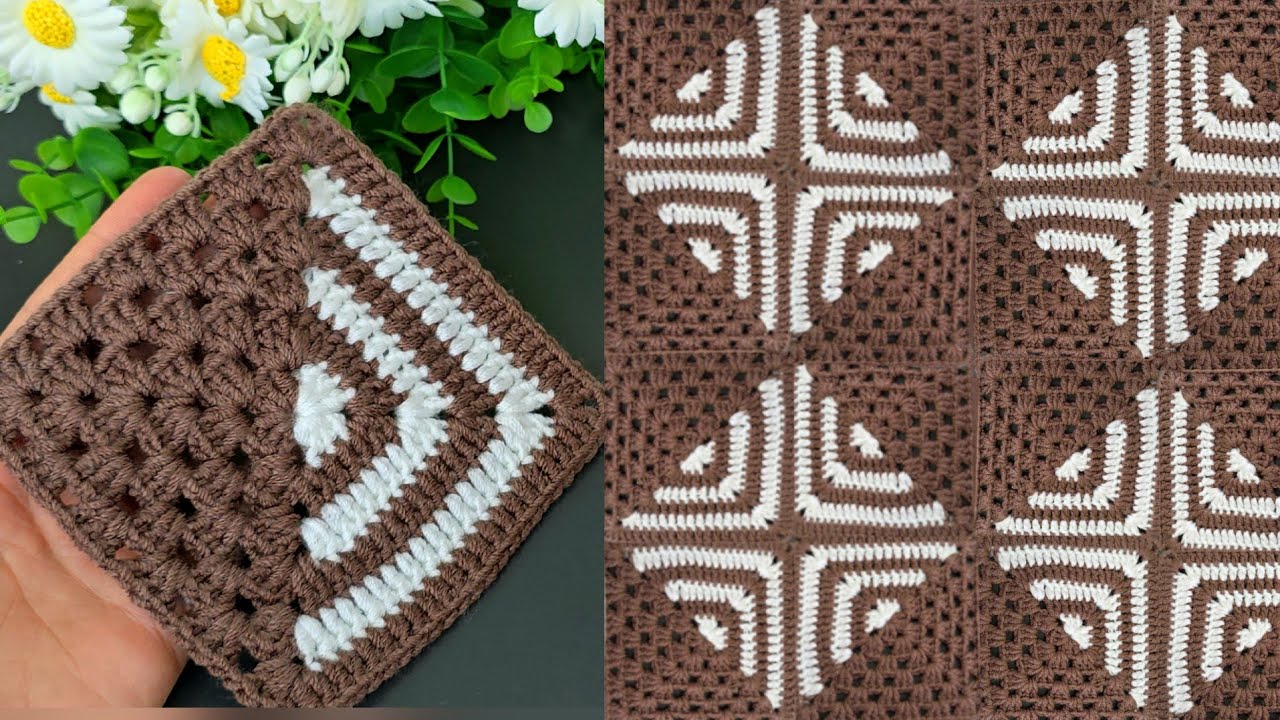
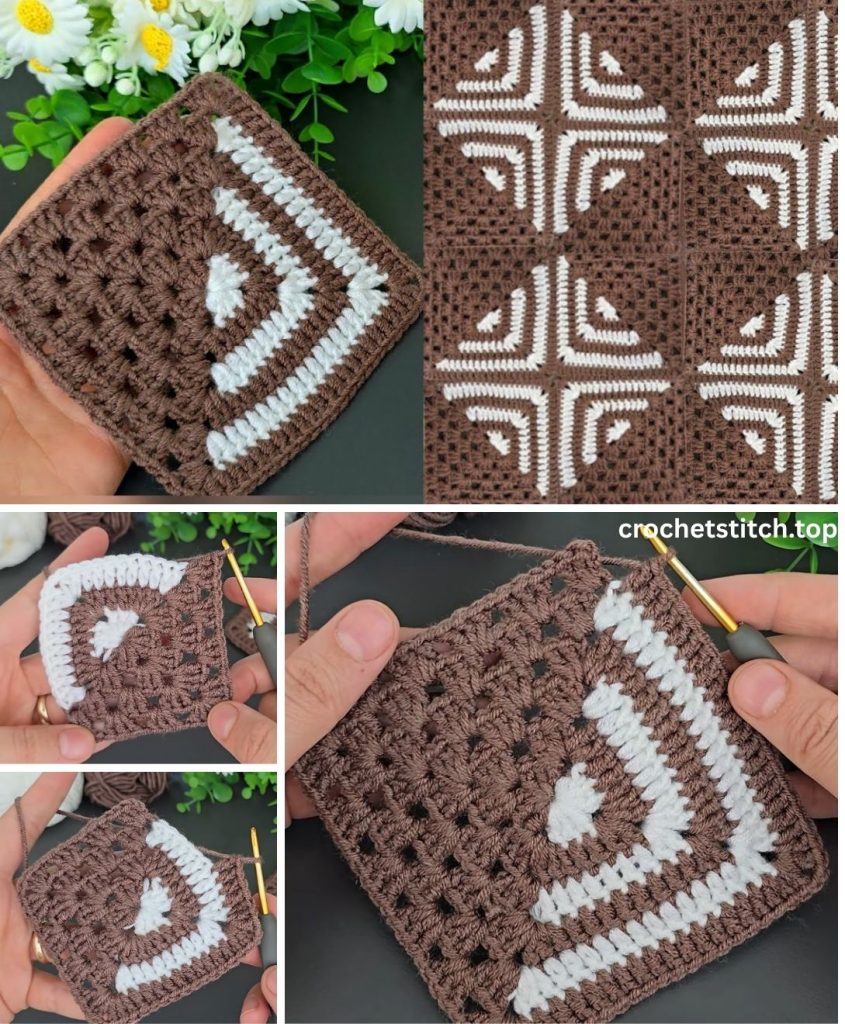
In this comprehensive guide, we will walk you through every step of creating a charming square with a classic brown and white design. We’ll start with a solid brown corner, introduce a crisp white center, and finish with a solid brown corner on the opposite side, resulting in a square with a thick, cozy brown border. It’s the perfect project for a cushion cover, a potholder (using cotton yarn!), or the first block of a future heirloom blanket.
So, grab your favorite hooks, a warm cup of tea, and let’s begin this cozy journey together!
Part 1: The Essentials – What You’ll Need
Before we dive into the stitches, let’s gather our supplies. A well-prepared workspace makes for a relaxing crochet session.
Materials:
- Yarn: Worsted weight (Aran, Category 4) yarn is perfect for this project as it works up quickly and shows off the stitch definition beautifully.
- Main Color (MC): A rich, chocolate brown. (Approx. 70-80 yards)
- Contrast Color (CC): A clean, crisp white. (Approx. 50-60 yards)
- Crochet Hook: A 5.0mm (H-8) hook is a standard choice for worsted weight yarn, but feel free to adjust to meet the gauge or your personal tension.
- Scissors: A small, sharp pair for trimming yarn.
- Yarn Needle (Tapestry Needle): This is essential for weaving in your ends for a professional, polished finish.
Gauge:
Gauge refers to the density of your stitches. While it’s less critical for a single square than for a fitted garment, it’s a good habit to practice.
- Gauge Swatch: 6 tiles x 6 tiles = 4 inches (10 cm) square.
- To check, simply follow the pattern for the first 6 rows, then measure the diagonal height.
Abbreviations (US Crochet Terms):
- ch: chain
- sl st: slip stitch
- dc: double crochet
- C2C: Corner to Corner
- MC: Main Color (Brown)
- CC: Contrast Color (White)
- *: repeat instructions after the asterisk as directed
The Basic C2C Tile:
The entire project is built from one simple repeating unit, which we’ll call a “tile” or “block.”
A single C2C tile consists of: ch 3, 3 dc.

Part 2: Understanding the Pattern & The Chart
Our square will be 17 tiles wide by 17 tiles tall. The design features a 4-tile wide brown border all around a central white square.
You can visualize this with a simple text chart. ‘B’ stands for Brown, and ‘W’ stands for White. We will only write out the first half (the increasing rows), as the second half is a mirror image.
- Row 1: 1B
- Row 2: 2B
- Row 3: 3B
- Row 4: 4B
- Row 5: 4B, 1W, 4B (Wait, this isn’t right for C2C. The chart represents the final look, but the rows are built diagonally).
Let’s write the C2C row-by-row instructions correctly:
- Row 1: 1B
- Row 2: 2B
- Row 3: 3B
- Row 4: 4B
- Row 5: 5B
- Row 6: 4B, 1W, 1B
- …and so on.
Let’s make this easier. We’ll integrate the color changes directly into the step-by-step instructions.
A Quick Note on Changing Colors: To change colors, work the last double crochet of a tile until you have two loops left on your hook. Drop the current color, yarn over with the new color, and pull it through the two loops to complete the stitch. You are now ready to work the next tile in the new color.
Part 3: The Pattern – Step by Step
Let’s start crocheting! We’ll divide the pattern into two main sections: the increasing rows (where we grow the square from one corner to its widest point) and the decreasing rows (where we shrink it back down to the opposite corner).
Section A: The Increasing Rows (Rows 1-17)
This is where we build the foundation and grow our square diagonally.
Row 1: With your Main Color (Brown), ch 6.
- DC in the 4th ch from the hook.
- DC in the next 2 ch.
- You have just created your first tile. (1 tile)
Row 2: Ch 6, turn your work.
- DC in the 4th ch from the hook and in the next 2 ch (1st tile of this row made).
- Find the ch-3 space at the top of the tile from Row 1.
- Sl st into that ch-3 space.
- Ch 3, then work 3 dc into that same ch-3 space (2nd tile of this row made). (2 tiles)
Row 3: Ch 6, turn.
- DC in the 4th ch from hook and in the next 2 ch.
- Sl st into the next ch-3 space, ch 3, 3 dc in the same space.
- Repeat from * to * one more time. (3 tiles)
Row 4: Ch 6, turn.
- DC in the 4th ch from hook and in the next 2 ch.
- Sl st into the next ch-3 space, ch 3, 3 dc in the same space.
- Repeat from * across the row. (4 tiles)
Row 5: Following the same method as Row 4. (5 tiles in Brown)

Now we introduce the White yarn!
Row 6: Ch 6 with Brown, turn.
- Work 4 tiles in Brown.
- On the final dc of the 4th tile, switch to White.
- Work 1 tile in White. (Total: 5 tiles)
Row 7: Ch 6 with White, turn.
- Work 2 tiles in White.
- On the final dc of the 2nd tile, switch to Brown.
- Work 4 tiles in Brown. (Total: 6 tiles)
Row 8: Ch 6 with Brown, turn.
- Work 4 tiles in Brown.
- Switch to White.
- Work 3 tiles in White. (Total: 7 tiles)
Row 9: Ch 6 with White, turn.
- Work 4 tiles in White.
- Switch to Brown.
- Work 4 tiles in Brown. (Total: 8 tiles)
Row 10: Ch 6 with Brown, turn.
- Work 4 tiles in Brown.
- Switch to White.
- Work 5 tiles in White. (Total: 9 tiles)
Row 11: Ch 6 with White, turn.
- Work 6 tiles in White.
- Switch to Brown.
- Work 4 tiles in Brown. (Total: 10 tiles)
Row 12: Ch 6 with Brown, turn.
- Work 4 tiles in Brown.
- Switch to White.
- Work 7 tiles in White. (Total: 11 tiles)
Row 13: Ch 6 with White, turn.
- Work 8 tiles in White.
- Switch to Brown.
- Work 4 tiles in Brown. (Total: 12 tiles)
Row 14: Ch 6 with Brown, turn.
- Work 4 tiles in Brown.
- Switch to White.
- Work 9 tiles in White. (Total: 13 tiles)
You’re doing great! Notice the pattern? The brown border stays 4 tiles wide, and the white center grows with each row.
Row 15: Ch 6 with Brown (this is the last row with a White section), turn.
- Work 10 tiles in White (starting with a CC tile first).
- Switch to Brown.
- Work 4 tiles in Brown. (Total: 14 tiles)
Row 16: Ch 6 with Brown, turn.
- Work 4 tiles in Brown.
- Switch to White.
- Work 11 tiles in White. (Total: 15 tiles)
Row 17: Ch 6 with Brown (starting with a CC tile first), turn.
- Work 12 tiles in White.
- Switch to Brown.
- Work 4 tiles in Brown. (Total: 16 tiles)
Wait, our square is 17×17. My apologies, I miscounted the rows above in the explanation. Let’s correct the pattern from Row 5 for a 17×17 square with a 4-tile border. The white center will be 17 – 4 – 4 = 9 tiles wide. The first white tile appears when the row is long enough to support it. Let’s re-do the rows from where the color change begins.
Corrected Increasing Rows:
- Rows 1-4: Work entirely in Brown. You will have 4 tiles at the end of Row 4.
- Row 5: (B) x 5
- Row 6: (B) x 6
- Row 7: (B) x 7
- Row 8: (B) x 4, (W) x 1, (B) x 3
- Row 9: (B) x 3, (W) x 2, (B) x 4
- Row 10: (B) x 4, (W) x 3, (B) x 3
- Row 11: (B) x 3, (W) x 4, (B) x 4
- Row 12: (B) x 4, (W) x 5, (B) x 3
- Row 13: (B) x 3, (W) x 6, (B) x 4
- Row 14: (B) x 4, (W) x 7, (B) x 3
- Row 15: (B) x 3, (W) x 8, (B) x 4
- Row 16: (B) x 4, (W) x 9, (B) x 3
- Row 17: (B) x 3, (W) x 10, (B) x 4. At the end of this row, you have reached the widest point. (17 tiles)
Section B: The Decreasing Rows (Rows 18-33)
Now that we’ve reached the middle, we need to start closing up the other side of the square. The key difference is how you start each row.
The Decrease Technique: Instead of chaining 6 to add a new tile, you will turn your work and slip stitch across the first 3 dc of the tile you just made. Sl st into the ch-3 space. This brings you to the starting position for the next tile, effectively reducing the row length by one tile.
Row 18: Turn your work.
- Sl st across the 3 dc of the first Brown tile. Sl st into the ch-3 space.
- Now, begin your first tile of this row: Ch 3, 3 dc into that same space.
- Continue the pattern across: Work 3 more tiles in Brown (for a total of 4).
- Switch to White. Work 9 tiles in White.
- Switch to Brown. Work 3 tiles in Brown. Do not make a final tile on the end. Simply finish your last dc. (Total: 16 tiles)
Row 19: Turn, sl st across the first tile.
- Following the pattern: (B) x 3, (W) x 8, (B) x 4. (Total: 15 tiles)
Row 20: Turn, sl st across.
- (B) x 4, (W) x 7, (B) x 3. (Total: 14 tiles)
Row 21: Turn, sl st across.
- (B) x 3, (W) x 6, (B) x 4. (Total: 13 tiles)
Row 22: Turn, sl st across.
- (B) x 4, (W) x 5, (B) x 3. (Total: 12 tiles)
Row 23: Turn, sl st across.
- (B) x 3, (W) x 4, (B) x 4. (Total: 11 tiles)
Row 24: Turn, sl st across.
- (B) x 4, (W) x 3, (B) x 3. (Total: 10 tiles)
Row 25: Turn, sl st across.
- (B) x 3, (W) x 2, (B) x 4. (Total: 9 tiles)
Row 26: Turn, sl st across.
- (B) x 4, (W) x 1, (B) x 3. (Total: 8 tiles)
Now, the white section is complete! You can cut your White yarn, leaving a 6-inch tail to weave in later. The rest of the square is solid Brown.
Row 27: Turn, sl st across.
- Work 7 tiles in Brown.
Row 28 – 32: Continue decreasing by one tile each row, working only in Brown.
Row 33: Turn, sl st across.
- Ch 3, 3 dc in the final ch-3 space. Sl st to the corner of the previous tile to secure. (1 tile)
Fasten off your yarn, leaving a 6-inch tail.
Part 4: Finishing Touches
Your crochet work is done, but these final steps will make your square look truly professional.
1. Weaving in the Ends
This is the most crucial finishing step. Thread each yarn tail onto your yarn needle. Weave the tail back and forth through the back of the stitches of the same color. Go in at least three different directions to secure it properly, then trim the excess yarn. This prevents your beautiful work from unraveling.
2. Adding a Border (Optional)
A simple border can neaten the edges and give your square a beautiful frame. A single crochet border is a perfect choice.
- Step 1: Join your Brown yarn with a sl st in any corner ch-3 space.
- Step 2: Ch 1. Work 3 single crochet (sc) stitches into that same corner space.
- Step 3: Work evenly down the side of the square. A good rule of thumb is to work 2 sc into the side of each dc post, and 1 sc around the chain space between tiles. The goal is to keep the edge flat, not ruffled or puckered. Adjust your stitch count as needed.
- Step 4: When you reach the next corner, work 3 sc into the corner space.
- Step 5: Repeat steps 3 and 4 all the way around the square.
- Step 6: When you get back to the beginning, sl st to the first sc to join. Fasten off and weave in the final end.
3. Blocking (Optional)
Blocking is the process of wetting or steaming your crochet to shape it. For a single square, you can simply lay it flat, spritz it with a bit of water, gently pat it into a perfect square shape, and let it air dry. This helps even out the stitches and defines the shape.
Congratulations!
You have successfully completed your beautiful Corner to Corner crochet square! You’ve not only learned the C2C technique but also mastered increasing, decreasing, and changing colors. This square is a testament to your skill and patience.
Now, what will it become? A decorative pillow front? The start of a cozy lap blanket? A chic placemat? The possibilities are endless. We hope you enjoyed this pattern and feel inspired to continue your crochet journey. Happy hooking!