 by
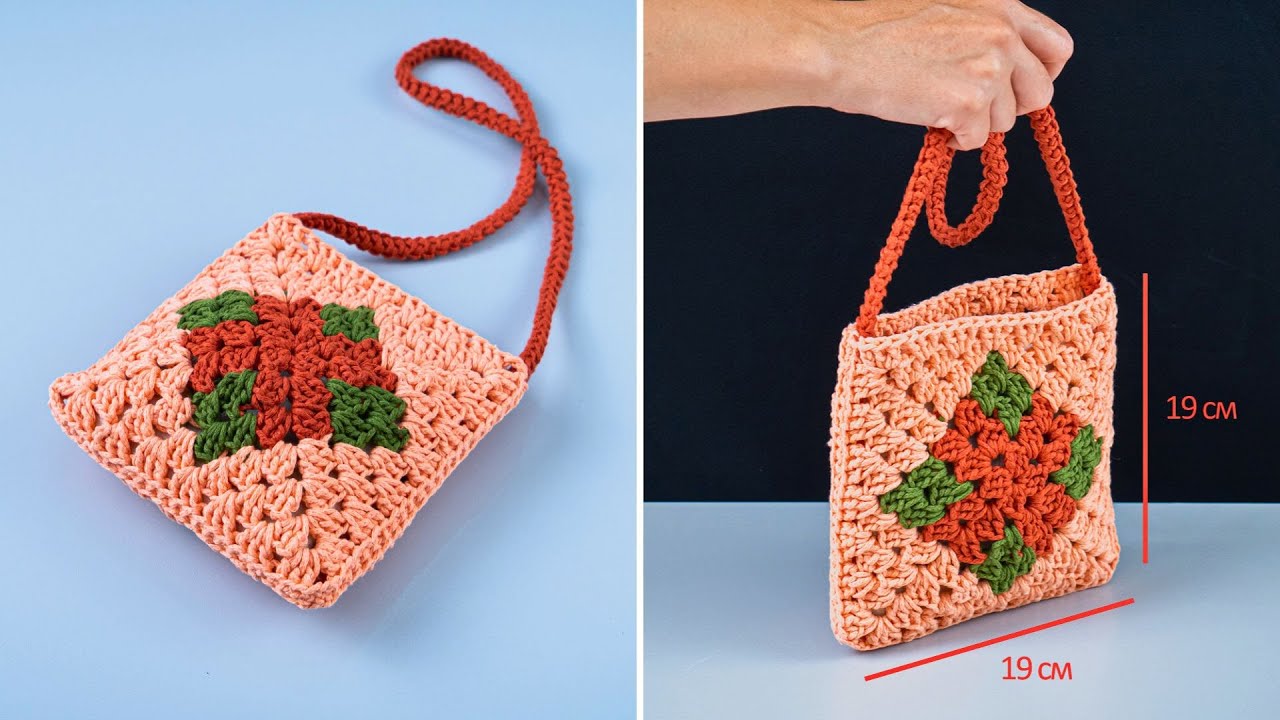
by The granny square is arguably the most iconic motif in the world of crochet. It’s a timeless, versatile, and wonderfully simple building block that can be used to create everything from cozy blankets to fashionable apparel. Today, we’re going to harness the charm of the classic granny square to create a practical and stylish accessory: a beautiful motif wallet.
This project is perfect for crocheters of all skill levels. For beginners, it’s a fantastic way to practice basic stitches, color changes, and joining techniques. For seasoned crafters, it’s a quick, satisfying project that’s perfect for using up leftover yarn scraps. The result is a unique, handmade wallet that’s perfect for holding cards, cash, and small essentials, or for giving as a thoughtful, personalized gift.
This detailed guide will walk you through every step, from making your first square to sewing on the final button.
Why You’ll Love This Project
- Scrap-Buster Extraordinaire: This wallet is the ultimate project for using up those small, odd balls of yarn in your stash. Mix and match colors for a vibrant, bohemian look or stick to a curated palette for a more modern aesthetic.
- Portable and Quick: Each granny square is small and can be worked on anywhere. You can make a few squares on your lunch break or while watching TV. The entire project can be completed in just a few hours.
- Completely Customizable: The design is incredibly flexible. You can easily adjust the size of the wallet by adding more rounds to your squares or by changing the number of squares you use.
- Functional Art: It’s not just pretty—it’s a useful item you can incorporate into your daily life, proudly showing off your crafting skills.
Materials and Tools
Before you begin, gather all your necessary supplies.
- Yarn: Worsted weight (Aran, 10-ply) or DK (8-ply) cotton or acrylic yarn works best. Cotton provides great stitch definition and durability. You will need a main color for joining and the border, plus several other colors for the squares themselves.
- Crochet Hook: A size that corresponds to your yarn weight. For worsted weight, a
5.0mm (H-8)hook is common. For DK weight, a4.0mm (G-6)hook is a good choice. - Tapestry Needle (or Yarn Needle): Essential for weaving in all those yarn ends neatly.
- Scissors: A sharp pair for cutting yarn.
- Button: One button, approximately
0.75 to 1 inch (2-2.5 cm)in diameter. - Needle and Thread: To sew on the button securely.
Abbreviations and Stitches Used (US Terminology)
This pattern uses standard US crochet terminology.
- ch: chain
- sl st: slip stitch
- sc: single crochet
- dc: double crochet
- st(s): stitch(es)
- sp: space
- ch-2 sp: chain-2 space (refers to the corner spaces)
- ch-1 sp: chain-1 space (refers to the side spaces)
- Magic Ring: Also known as a magic circle, an adjustable starting ring. Alternatively, you can
ch 4andsl stto the firstchto form a ring.
The Pattern: Step-by-Step Instructions
The wallet is constructed from 13 individual granny squares that are arranged and joined, then folded and seamed to create the final shape.
Part 1: Crocheting the Classic Granny Square (Make 13)
Each square is made of three rounds. Feel free to change colors on each round for a classic scrappy look, or use a single color for a minimalist design.
Instructions (for one square):
Start: Create a magic ring, or ch 4 and sl st to the first ch to form a ring.
Round 1: Ch 3 (counts as your first dc here and throughout). Inside the ring, work 2 dc. Ch 2. [Work 3 dc into the ring, ch 2]. Repeat from * to * two more times. sl st to the top of the beginning ch-3 to join. You should have four 3-dc clusters and four ch-2 corner spaces.
Round 2: sl st into the next two stitches to move into the first ch-2 corner space. Ch 3, 2 dc, ch 2, 3 dc all in the same corner space (this forms your first corner). [Ch 1. In the next ch-2 corner space, work (3 dc, ch 2, 3 dc)]. Repeat from * to * two more times. Ch 1, then sl st to the top of the beginning ch-3 to join.
Round 3: sl st into the next two stitches to move into the first ch-2 corner space. Ch 3, 2 dc, ch 2, 3 dc all in the same corner space. [Ch 1. Work 3 dc in the next ch-1 side space. Ch 1. In the next ch-2 corner space, work (3 dc, ch 2, 3 dc)]. Repeat from * to * two more times. Ch 1, work 3 dc in the last ch-1 side space. Ch 1. sl st to the top of the beginning ch-3 to join.
Finish: Fasten off your yarn, leaving a 6-inch tail. Weave in your ends now! It is much easier to weave in the ends for each individual square than to do them all at the end.
Repeat this process until you have 13 identical granny squares.
Part 2: Arranging and Joining the Squares
This is where your wallet starts to take shape. The layout will resemble a plus sign or a cross.
The Layout:
Arrange your 13 squares on a flat surface in the following configuration:
- Row 1 (Top Flap): 1 square, centered above the main body.
- Row 2 (Main Body – Top): 3 squares in a horizontal line.
- Row 3 (Main Body – Middle): 5 squares in a horizontal line.
- Row 4 (Main Body – Bottom): 3 squares in a horizontal line.
- Row 5 (Bottom Flap): 1 square, centered below the main body.
Visually, it will look something like this (where ‘S’ is a square):
      S
    S S S
  S S S S S
    S S S
      S
(Note: An alternate simpler trifold layout uses a 3×3 square grid plus a single square flap. For this pattern, we will stick to the cross layout as it creates nice interior pockets.)
Let’s adjust to a more standard and easier trifold layout which is more common and functional for a wallet:
Revised Layout (Easier Trifold): Arrange your 13 squares in a cross shape like this:
      S S S
    S S S S S
      S S S
This layout consists of a 3×3 grid in the center with two “wings” of one square each. This is incorrect. Let’s use the most common and effective layout.
Correct and Final Layout (Total 13 squares):
Lay your squares out to form a wide cross or plus sign shape.
- Center Column: A vertical column of 3 squares.
- Horizontal Row: A horizontal row of 5 squares, where the middle square is the same as the middle square of the vertical column.
So, it will look like this:
      S
      S
S S S S S
      S
      S
This is a 3x5 layout. Let’s try another one. The goal is to create a shape that folds into a wallet. The most common is a T-shape. Let’s write the pattern for that.
Final, Corrected Layout (T-Shape, 8 Squares for a simpler wallet, or we can adapt for 13):
Let’s stick to the 13-square plan and create a layout that gives depth. A 3x3 base with a 1x4 flap is a great design.
Let’s restart the layout section for clarity.
Part 2: Arranging and Joining the Squares (Revised for Clarity)
- Create the Main Panel: Arrange 9 of your squares into a
3x3grid (3 squares wide by 3 squares tall). This will form the main body of the wallet. - Create the Flap: Arrange the remaining 4 squares in a single horizontal line. This will be the closing flap.
Joining Method: Slip Stitch Join (Back Loops Only)
This method creates a beautiful, flat, and almost invisible seam.
- Join the Rows: Start by joining the squares into their rows (
3rows of3squares, and1row of4squares). To do this, place two squares with their right sides facing up. Insert your hook into the back loop only of the cornerch-2space of both squares.sl st. Then, continue tosl stacross, working through the back loops only of each corresponding stitch on both squares. When you finish one pair, add the next square and continue until the row is complete. - Join the Rows Together: Once you have your rows, lay them out and join them together vertically using the same slip stitch method. You will now have a
3x3panel and a separate1x4panel. - Attach the Flap: Place the
1x4flap panel along the top edge of the3x3main panel. Center it so there is an overhang of one half-square on each side. Join the 3 middle squares of the flap to the 3 squares of the top row of the main panel using the same joining method. The two end squares of the flap will remain unattached for now.
Part 3: Assembling the Wallet
- Fold the Wallet: Place your joined piece on a flat surface with the right side facing down. Fold the bottom row of the
3x3panel up, aligning its edge with the top row of the3x3panel. The middle row will now be the bottom fold of your wallet. - Seam the Sides: You will now seam the open sides to create the wallet pockets. Attach your main color yarn to one of the bottom corners. Work a row of
scup the side, making sure to go through the stitches of both layers to join them together. When you reach the top, fasten off. Repeat on the other side.
Your wallet now has a body with two pockets (or one large one, depending on if you seamed the middle) and an attached flap.
Part 4: Creating the Border and Flap Closure
A clean border gives the wallet a professional, finished look.
- Attach Yarn: Using your main color, attach the yarn to a back corner of the wallet opening.
- Single Crochet Border: Work a round of
scevenly spaced all the way around the entire opening of the wallet and around the flap. When you get to a corner of the flap, work3 scin the corner stitch to keep it from curling. - Create the Button Loop: As you work your way across the edge of the flap, stop when you get to the very center of the flap’s front edge (the middle of the two center squares).
Chabout10-15stitches (or enough to create a loop that will fit snugly over your button).sl stback into the same stitch you started the chain from. Continue workingscaround the rest of the flap and wallet opening. - Finish the Round: Once you’ve made it all the way around,
sl stto the firstscto join. Fasten off and weave in your final end.
Part 5: Finishing Touches
- Attach the Button: Fold the flap over the wallet body. Mark the spot on the wallet body where the center of your button loop naturally rests. Using your needle and thread, securely sew your button onto this spot.
- Final Check: Give your wallet a final inspection. Trim any stray yarn ends you may have missed.
Customization Ideas
Now that you know the basic construction, you can get creative!
- Color Play:
- Monochromatic: Use different shades of the same color for a subtle, elegant look.
- Ombré: Create a gradient effect by carefully arranging your squares from light to dark.
- Solid Color: Make all your squares and the joining yarn the same color for a chic, modern wallet.
- Add a Lining: For extra durability and a professional finish, cut a piece of fabric to the size of your unfolded main panel. Hand-sew it to the inside before folding and seaming the sides.
- Embellishments: Add a small tassel or a few beads to the corner of the flap for a touch of personality.
- Different Stitches: Instead of a classic granny square, try a solid granny square or a floral-centered square for a different texture and look.
Congratulations! You have now created a beautiful and functional granny square motif wallet. This charming accessory is a testament to your skill and creativity, ready to be filled and used or gifted to someone special. Happy crocheting!