 by
by Here is a detailed, step-by-step tutorial on how to crochet an adorable summer flower hat. This article is designed to be comprehensive, guiding you from the first stitch to the final product with tips and clear instructions.
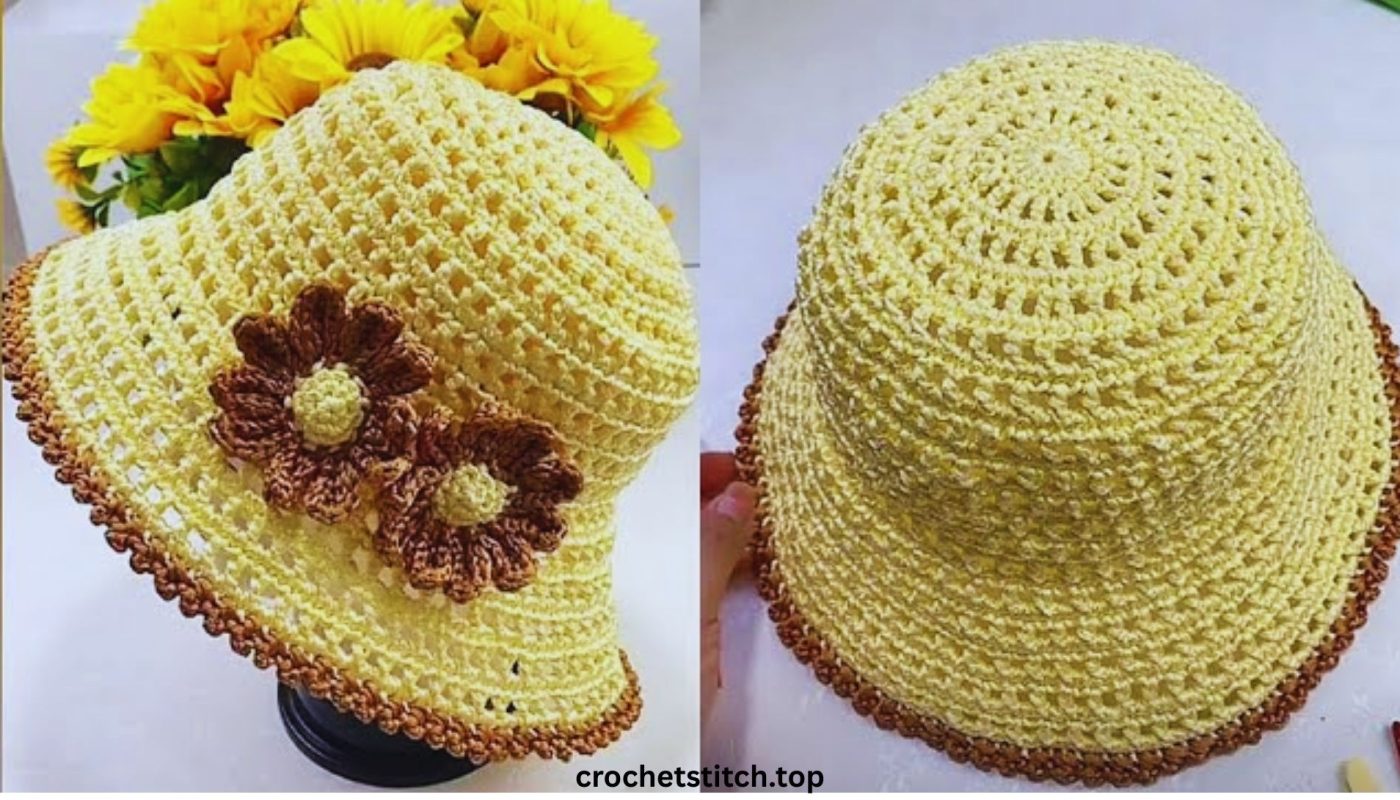
Craft Your Own Sunshine: A Detailed Tutorial for the Adorable Summer Flower Crochet Hat
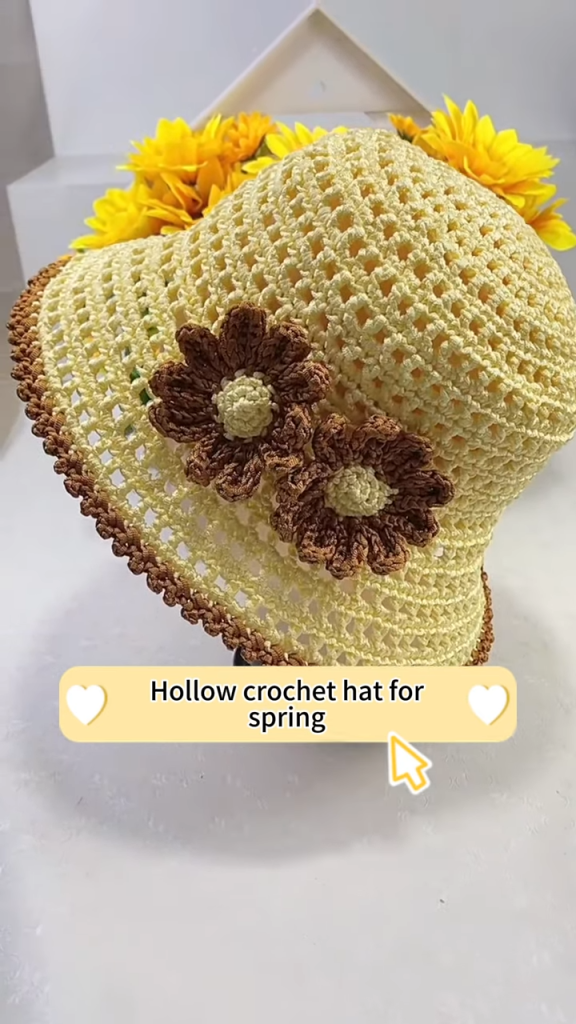
Welcome to the ultimate guide to creating your very own Summer Flower Crochet Hat! This charming and stylish accessory is perfect for sunny days, beach trips, music festivals, or simply adding a touch of handmade beauty to your everyday outfits. The hat is constructed from delightful flower granny squares, giving it a vibrant, retro-inspired look that is both eye-catching and timeless.
This tutorial is designed for an advanced beginner or intermediate crocheter who is comfortable with basic stitches and techniques like working in the round and joining pieces. We will break down every step, from creating the individual flower squares to assembling the hat and crocheting the perfect brim. Let’s gather our materials and begin this joyful project!
1. Materials and Tools
Choosing the right materials is key to creating a lightweight and breathable summer hat. A 100% cotton or a cotton-blend yarn is highly recommended as it holds its shape well and is comfortable to wear in warm weather.
- Yarn: DK (Double Knitting) or a light worsted weight (Weight #3 or #4) yarn.
- Color A: For the flower center (e.g., Yellow, Cream) – approx. 20 yards.
- Color B: For the flower petals (e.g., White, Pink, Lavender) – approx. 50 yards.
- Color C: For the square background and joining (e.g., Sage Green, Sky Blue, Ecru) – approx. 150 yards.
- Color D: For the brim (can be the same as Color C or a complementary color) – approx. 100 yards.
- Crochet Hook: A 4.0mm (G-6) crochet hook, or the size recommended for your chosen yarn. Using a slightly smaller hook than recommended can create a denser fabric, which is great for a hat.
- Scissors: A sharp pair for cutting yarn.
- Yarn Needle (or Tapestry Needle): Essential for weaving in ends and seaming.
- Stitch Markers: Useful for marking the beginning of rounds, especially for the brim.
- Measuring Tape: To check your gauge and the hat’s dimensions.
2. Abbreviations and Essential Stitches (US Terms)
This pattern is written in standard US crochet terminology.
- ch: Chain
- st(s): Stitch(es)
- sl st: Slip Stitch
- sc: Single Crochet
- hdc: Half Double Crochet
- dc: Double Crochet
- tr: Treble Crochet
- sp: Space
- beg: Beginning
- MR: Magic Ring (or Magic Circle)
- […]: Repeat instructions within brackets as directed.
- (…): Stitches worked into the same space.
Special Stitch: Puff Stitch (Puff st)
- Yarn over, insert hook into the indicated stitch.
- Yarn over and pull up a loop (3 loops on hook).
- Repeat steps 1 and 2 two more times in the same stitch (7 loops on hook).
- Yarn over and pull through all 7 loops on the hook.
- Chain 1 to secure the puff stitch. (This
ch 1is often part of the stitch itself and is not counted as a separate chain unless specified).
3. Gauge and Sizing
Gauge: One finished Flower Granny Square should measure approximately 4.5 inches x 4.5 inches (11.5 cm x 11.5 cm) after Round 4.
Sizing: This pattern creates a hat that fits an average adult head circumference of 21-23 inches (53-58 cm). To adjust the size, you can:
- Go up or down a hook size. A larger hook makes a larger hat; a smaller hook makes a smaller hat.
- Add or remove a round on the granny squares or add/remove squares from the sides (this requires more adjustment).
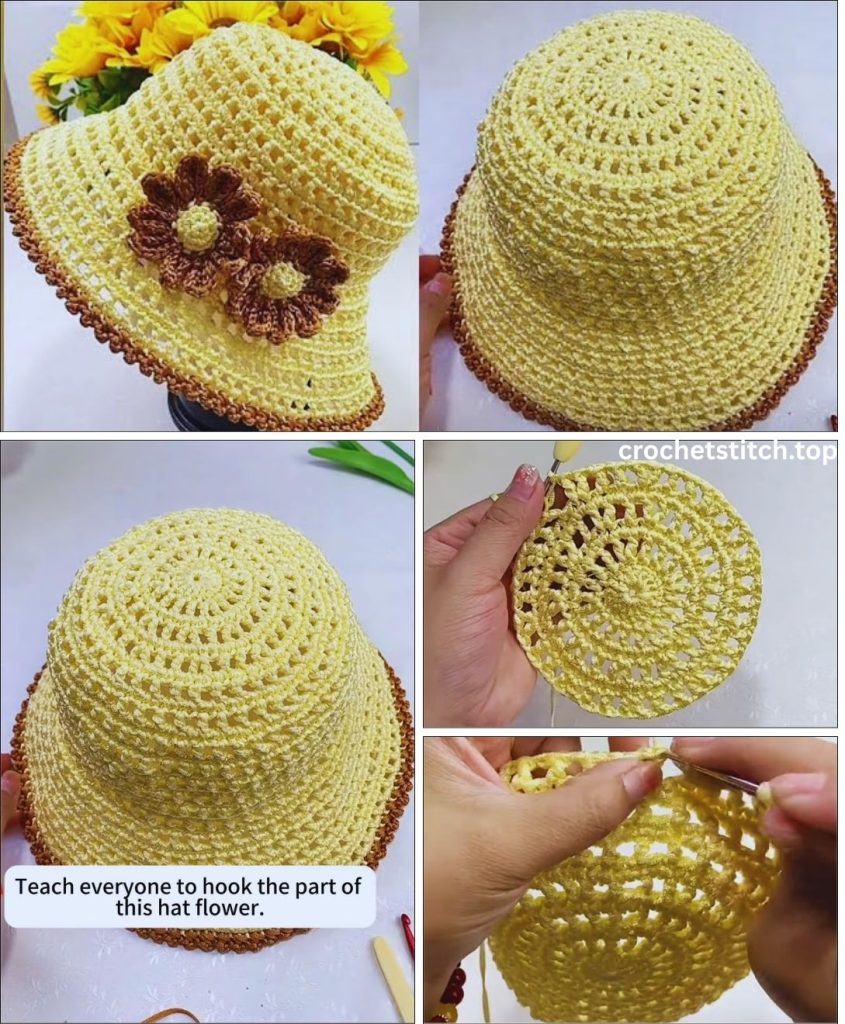
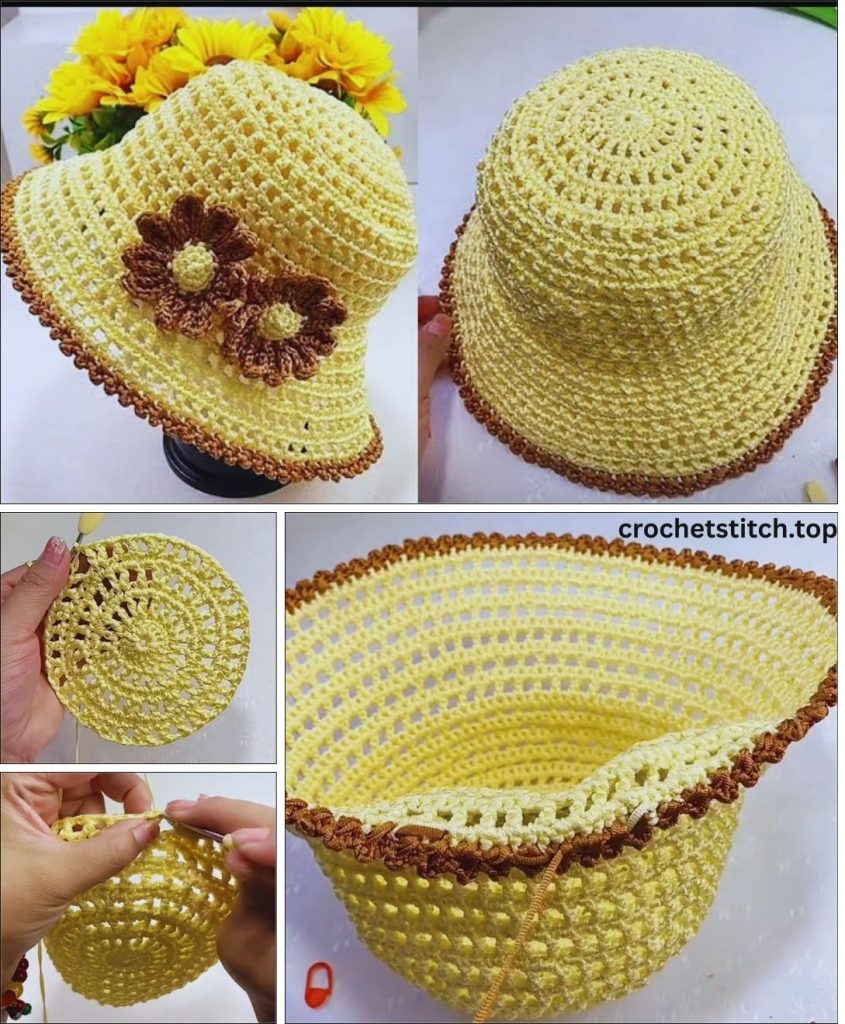
Part 1: Crocheting the Flower Granny Square
For a standard adult-sized bucket hat, you will need to make 15 identical squares. The hat is constructed with 5 squares for the flat top (crown) and 10 squares for the vertical sides.
Let’s begin!
Round 1: Flower Center
- With Color A (Yellow):
- Start with a MR.
- Ch 3 (counts as the first dc), work 11 dc into the MR.
- Join with a sl st to the top of the beg ch-3. (Total of 12 dc).
- Fasten off Color A and weave in the end.
Round 2: Petals
- Join Color B (White) with a sl st in any st:
- Ch 2 (does not count as a stitch). Work a Puff st in the same stitch you joined in.
- [Ch 1, skip the next st, Puff st in the next st].
- Repeat from * to * four more times. Ch 1.
- Join with a sl st to the top of the first Puff st. (Total of 6 Puff st petals, separated by ch-1 spaces).
- Fasten off Color B and weave in the end.
Round 3: Squaring the Circle
- Join Color C (Sage Green) with a sl st in any ch-1 sp between petals:
- First Corner: Ch 3 (counts as first dc), work (2 dc, ch 2, 3 dc) all in the same ch-1 sp.
- First Side: Ch 1, work 3 hdc in the next ch-1 sp.
- Second Corner: Ch 1, work (3 dc, ch 2, 3 dc) in the next ch-1 sp.
- Second Side: Ch 1, work 3 hdc in the next ch-1 sp.
- Third Corner: Ch 1, work (3 dc, ch 2, 3 dc) in the next ch-1 sp.
- Third Side: Ch 1, work 3 hdc in the next ch-1 sp.
- Fourth Corner: Ch 1, work (3 dc, ch 2, 3 dc) in the next ch-1 sp.
- Fourth Side: Ch 1, work 3 hdc in the next ch-1 sp. Ch 1.
- Join with a sl st to the top of the beg ch-3.
- You should now have a distinct square shape.
Round 4: Final Square Round
- Continue with Color C.
- Sl st across the next 2 dc and into the corner ch-2 sp.
- First Corner: Ch 3 (counts as first dc), work (2 dc, ch 2, 3 dc) in the same ch-2 sp.
- Side: [Ch 1, 3 dc in the next ch-1 sp]. Repeat this twice across the side.
- Next Corner: Ch 1, work (3 dc, ch 2, 3 dc) in the next corner ch-2 sp.
- Repeat the Side and Next Corner instructions two more times.
- Finish the last side: [Ch 1, 3 dc in the next ch-1 sp]. Repeat twice. Ch 1.
- Join with a sl st to the top of the beg ch-3.
- Fasten off and weave in your ends. Your first square is complete!
Repeat this process until you have 15 beautiful flower squares.
Part 2: Assembling the Hat
This is where your flat squares transform into a three-dimensional hat! We will be using a whip stitch or your preferred seaming method to join the squares. Use Color C for a seamless look.
Step 1: Assembling the Crown (Top of the Hat)
- Take 5 of your squares.
- Lay them out in a cross shape: one central square and four squares surrounding it, one on each side.
- First, sew the four outer squares to the four sides of the central square. Cut a long piece of yarn and use your yarn needle to whip stitch the edges together, working through the back loops only for a flatter seam.
- Next, sew the adjacent sides of the outer squares together. When you fold these up, they will create the corners of the crown. You are essentially closing the gaps in the cross shape. When laid flat, it will now look like a plus sign with the corners filled in. This 5-square piece forms the flat circular top of your hat.
Step 2: Assembling the Sides (Body of the Hat)
- Take the remaining 10 squares.
- Join them side-by-side into a long strip that is 10 squares long.
- Once you have a long strip, join the two short ends together to form a large ring or band. This band is the vertical side of your hat.
Step 3: Joining the Crown and Sides
- You now have two pieces: the 5-square crown and the 10-square side-band.
- The perimeter of the crown should match the perimeter of the side-band. The crown has 8 outer edges (2 from each of the 4 outer squares). The side-band is 10 squares around, but since we sewed it into a circle, its top edge also has 10 square-lengths. It might require a little stretching or easing, but they should fit. Correction for clarity: The perimeter of the 5-square crown piece has 8 sides. The 10-square band is slightly larger, which gives the bucket hat its characteristic gentle slope.
- With the pieces inside out, align the top edge of the side-band with the outer edge of the crown. Pin them together if it helps.
- Carefully whip stitch the two pieces together all the way around.
Turn your hat right-side out. It should now have a distinct hat shape! Try it on to check the fit before proceeding to the brim.
Part 3: Crocheting the Brim
The brim gives the hat its classic bucket shape and provides shade. We will work in continuous rounds, so use a stitch marker to mark the beginning of each round.
- Join Color D (or continue with C) with a sl st anywhere along the bottom edge of the hat body.
Round 1: Foundation Round
- Ch 1 (does not count as a stitch). Work 1 sc in the end of each stitch and ch-1 space around the entire bottom edge. Aim for a consistent number of stitches per square (e.g., 15-16 sc per square). The exact number isn’t critical, but it must be a multiple of 6 for the increase rounds to work smoothly. Count your stitches.
- Join with a sl st to the first sc. Let’s assume you have 150 sts for this example.
Round 2: First Increase Round
- Ch 1, sc in the same st.
- [Sc in the next 9 sts, 2 sc in the next st (increase made)].
- Repeat from * to * all the way around. Join with a sl st to the first sc. (e.g., 165 sts).
Round 3: Plain Round
- Ch 1, sc in each st around. Join.
Round 4: Second Increase Round
- Ch 1, sc in the same st.
- [Sc in the next 10 sts, 2 sc in the next st].
- Repeat from * to * all the way around. Join. (e.g., 180 sts).
Round 5: Plain Round
- Ch 1, sc in each st around. Join.
Round 6: Third Increase Round
- Ch 1, sc in the same st.
- [Sc in the next 11 sts, 2 sc in the next st].
- Repeat from * to * all the way around. Join. (e.g., 195 sts).
Rounds 7-10 (or until desired brim width):
- Continue this pattern of one increase round followed by one plain round. On each increase round, add one more sc between the increases (e.g.,
sc in next 12, thensc in next 13, etc.). This creates a gentle, flat flare. - For a wavier, “lettuc-edge” brim, do an increase round every round.
- For a stiffer brim, do two or three plain rounds between each increase round.
Final Round: Finishing Edge
- To create a clean, sturdy edge, work one final round of sl st loosely in each stitch around. This prevents the brim from curling too much.
- Fasten off and meticulously weave in any remaining ends.
Finishing Touches and Customization
- Blocking: While not always necessary for cotton, light steam blocking can help even out your stitches and define the square shape. Pin the hat to a mannequin head or a towel-stuffed bowl, lightly spray with water or use a steamer, and let it dry completely.
- Color Play: The beauty of this hat is its versatility. Use a different color for every square, create a rainbow effect, or go for a monochrome look.
- Add a Cord: You can weave a crocheted chain or a ribbon through the base of the hat body to create an adjustable chin strap.
Congratulations! You have now completed your adorable and unique Summer Flower Crochet Hat. Wear it with pride, knowing you created a beautiful, functional piece of art with your own two hands. Enjoy the sunshine!