by
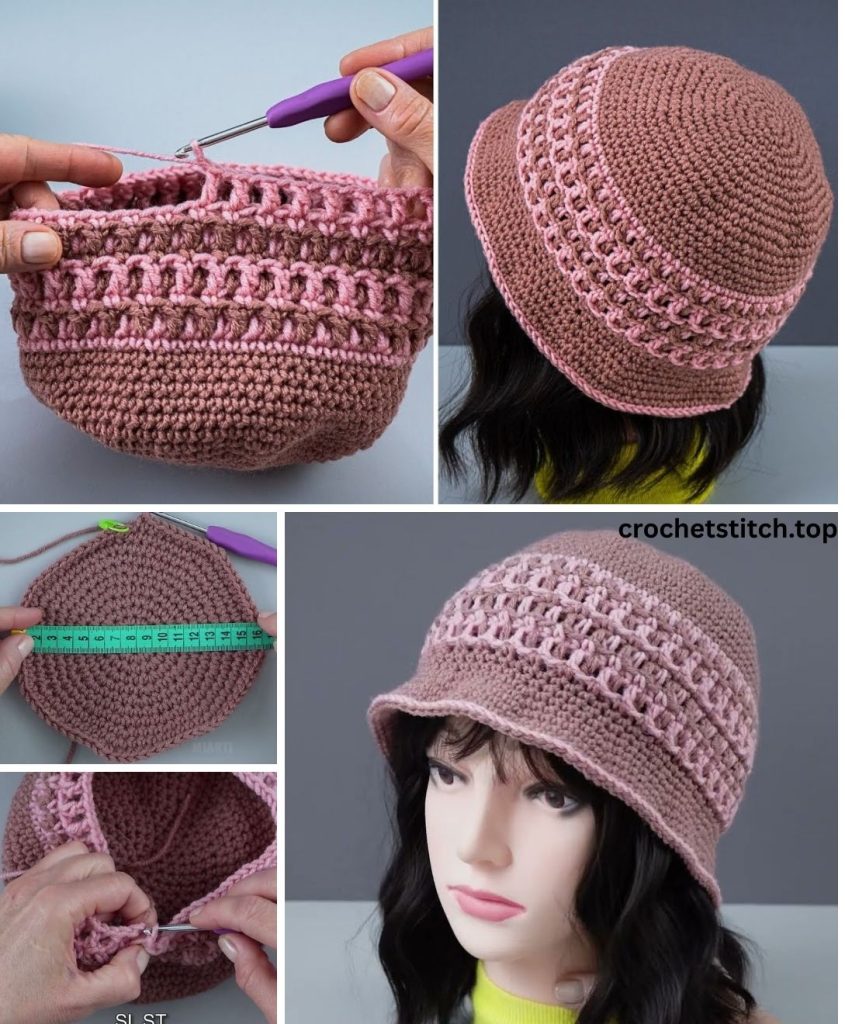
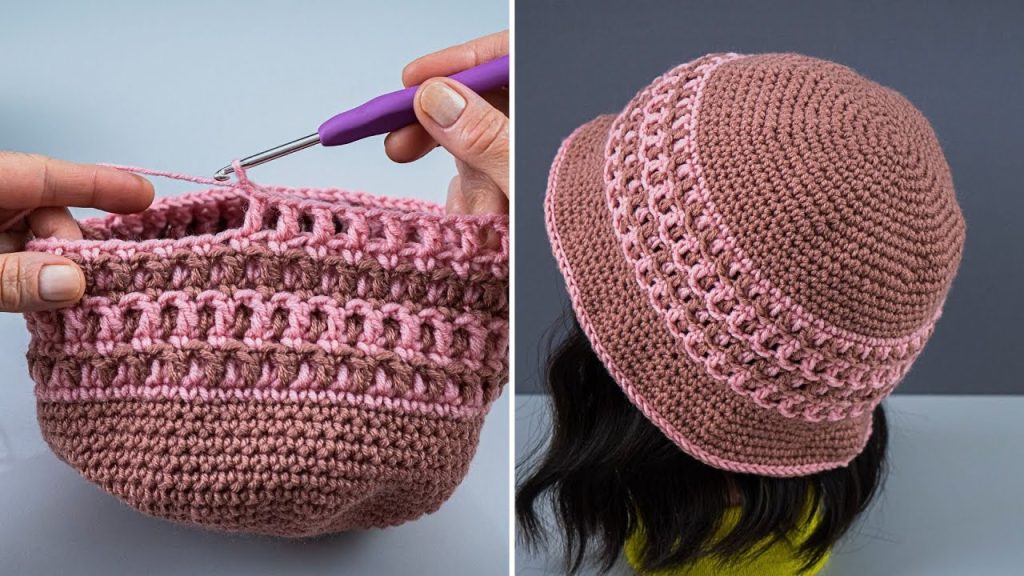
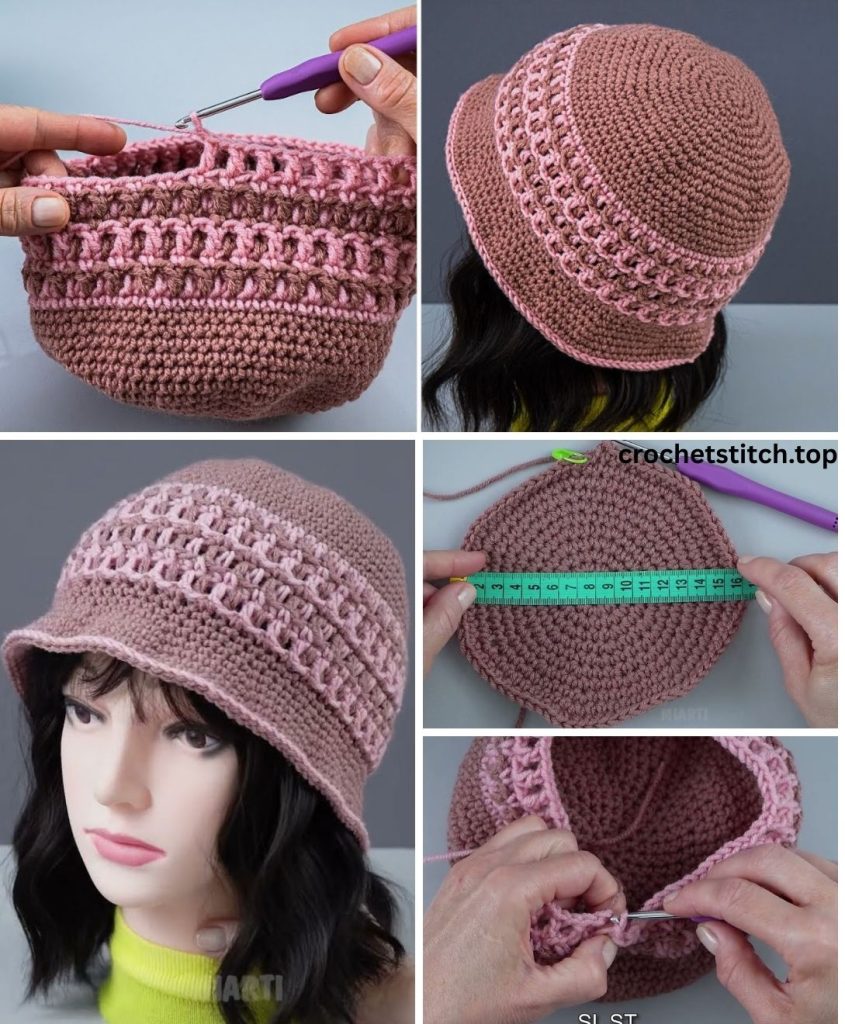
by A hollow crochet bucket hat is a fantastic project that combines a breezy, open design with the classic bucket hat shape. The “hollow” or airy feel comes from using a simple stitch pattern that incorporates chain spaces, making it lightweight and perfect for warm weather. This tutorial will guide you through each step, from the materials to the finished hat, in a way that’s easy for beginners to follow.
Materials You’ll Need
- Yarn: Approximately 100-150 grams of lightweight (DK/8-ply) or worsted weight (aran/10-ply) cotton or cotton-blend yarn. Cotton is an excellent choice for this hat because it’s breathable, durable, and holds its shape well.
- Crochet Hook: A hook size appropriate for your chosen yarn. A 4.0mm (G/6) or 5.0mm (H/8) hook is typically a good choice. Always check the yarn label for the recommended hook size.
- Scissors
- Yarn Needle (Tapestry Needle): For weaving in ends.
- Stitch Marker: Highly recommended for keeping track of your rounds, especially with this pattern.
Key Crochet Stitches and Techniques
- Magic Ring (or Chain 2 and work in the second chain from the hook): This creates a neat, closed center for your hat.
- Chain (ch): The most basic crochet stitch.
- Slip Stitch (sl st): Used to join rounds.
- Double Crochet (dc): The primary stitch for this pattern.
- Hollow Stitch Pattern: This is the star of the show, consisting of alternating double crochets and chain spaces (
dc, ch 1, sk 1). It creates the airy texture. - Crocheting in the Round: The entire hat is worked in a circular pattern.
Part 1: The Crown of the Hat (The Flat Top)
The crown is a flat circle that sits on the top of your head. We’ll use a simple increasing pattern that builds the hollow stitch design from the start.
- Foundation: Start with a magic ring.
- Round 1: Ch 3 (counts as your first dc). Work
(ch 1, 1 dc)10 more times into the ring. You will have a total of 11 dc stitches separated by 11 ch-1 spaces. Join with a sl st to the 2nd chain of your starting ch-3. (11 dc, 11 ch-1 spaces).
- Round 1: Ch 3 (counts as your first dc). Work
- Increasing Rounds:
- Round 2: Sl st into the first ch-1 space. Ch 3 (counts as your first dc). Work
(ch 1, 1 dc)into the same ch-1 space. Now,(ch 1, 2 dc)into each ch-1 space around. Join with a sl st to the 2nd chain of the starting ch-3. (22 dc, 22 ch-1 spaces). - Round 3: Sl st into the first ch-1 space. Ch 3.
(ch 1, 1 dc)into the next ch-1 space. Now,(ch 1, 2 dc)into the next ch-1 space.(ch 1, 1 dc)into the next ch-1 space. Repeat this pattern around. Join with a sl st to the 2nd chain of the starting ch-3. (33 dc, 33 ch-1 spaces). - Round 4: Sl st into the first ch-1 space. Ch 3.
(ch 1, 1 dc)into the next 2 ch-1 spaces. Now,(ch 1, 2 dc)into the next ch-1 space.(ch 1, 1 dc)into the next 2 ch-1 spaces. Repeat this pattern around. Join with a sl st to the 2nd chain of the starting ch-3. (44 dc, 44 ch-1 spaces).
- Round 2: Sl st into the first ch-1 space. Ch 3 (counts as your first dc). Work
Continuing the Increases: Continue this increasing pattern, adding one extra dc, ch 1 cluster between your increases for each round until the crown of the hat measures about 6-7 inches in diameter. You can try the hat on as you go to ensure a good fit.
Part 2: The Body of the Hat (The Sides)
Once the crown is the correct size, you will stop increasing and work straight rounds to create the sides of the hat. This will cause the hat to start folding down.
- Stop Increasing:
- Round 8 (example): Sl st into the first ch-1 space. Ch 3.
(ch 1, 1 dc)into each ch-1 space around. Join with a sl st to the 2nd chain of the starting ch-3.
- Round 8 (example): Sl st into the first ch-1 space. Ch 3.
- Continue Straight Rounds:
- Repeat this process for approximately 8-10 more rounds, or until the hat reaches just above your ears. The number of rounds will determine how deep the hat is.
Note: The hollow stitch pattern is great for working in a continuous spiral. If you’re comfortable, you can simply place a stitch marker in the first stitch of the round and work your straight rounds without joining.
Part 3: The Brim of the Hat
The brim is what gives the bucket hat its classic shape. We will now reintroduce increases to make the hat flare out. The hollow stitch pattern makes for a light and floppy brim.
- First Brim Round:
- Sl st into the first ch-1 space. Ch 3.
(ch 1, 1 dc)into the next ch-1 space.(ch 1, 2 dc)into the next ch-1 space. Repeat this pattern around. Join with a sl st to the 2nd chain of the starting ch-3.
- Sl st into the first ch-1 space. Ch 3.
- Second Brim Round:
- Sl st into the first ch-1 space. Ch 3.
(ch 1, 1 dc)into the next 2 ch-1 spaces.(ch 1, 2 dc)into the next ch-1 space. Repeat this pattern around. Join with a sl st to the 2nd chain of the starting ch-3.
- Sl st into the first ch-1 space. Ch 3.
Continuing the Brim: Continue this pattern for a few more rounds, increasing the number of (dc, ch 1) clusters between the increases. The more rounds you work, the wider the brim will be. Most bucket hats have a brim that is 2-4 inches wide.
Part 4: Finishing the Hat
Once the brim is the desired width, it’s time to finish off your hat with a neat edge.
- Final Round: For a clean finish, work a round of slip stitches or single crochet stitches all the way around the brim. This will create a firm, clean edge.
- Fasten Off: After completing the final round, cut your yarn, leaving a 6-inch tail. Pull the tail through the last loop on your hook to secure the stitch.
- Weave in Ends: Using your yarn needle, carefully weave in all the loose ends on the inside of the hat. Weave them through the stitches in different directions to ensure they are secure and hidden.
Blocking (Optional but Recommended): For a professional finish, you can gently block your hat. Simply mist the hat with water, shape the brim, and let it air dry. This will help open up the stitches and give the hat a nice, finished drape.
Congratulations! You have successfully crocheted a stylish and airy hollow summer bucket hat. Enjoy your new handmade accessory!