 by
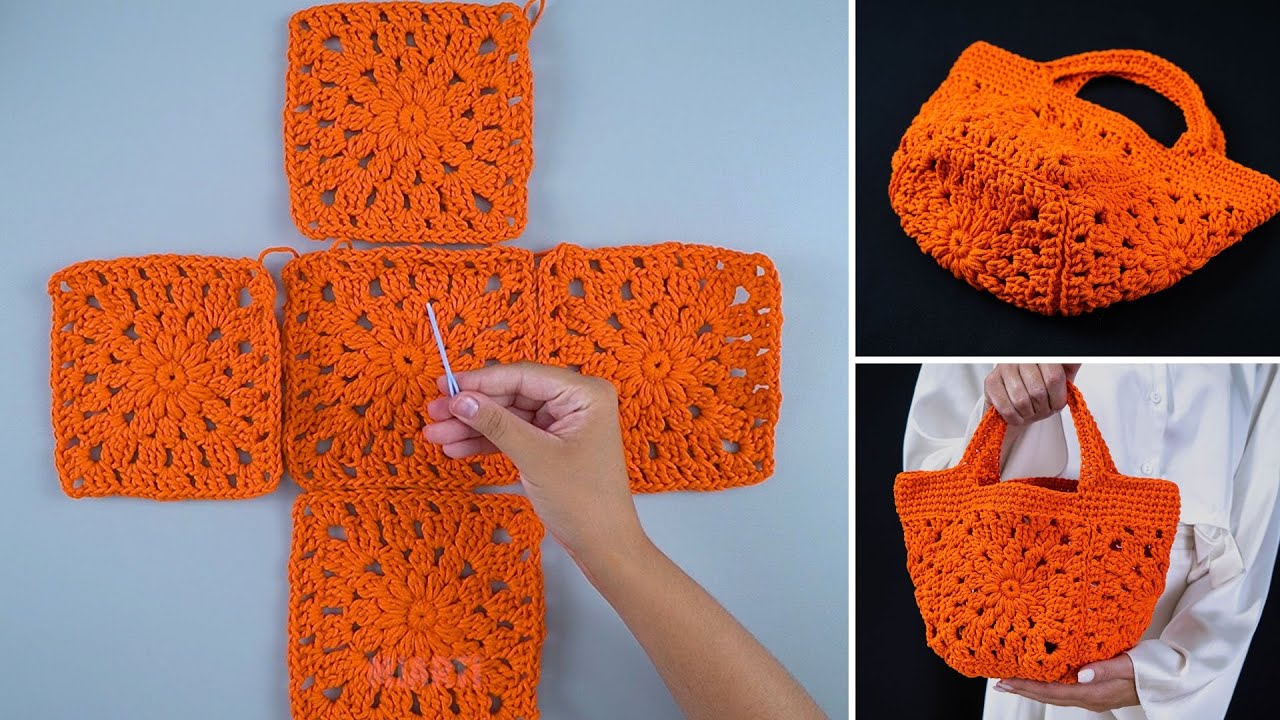
by Creating a crochet handbag is a rewarding project that results in a beautiful and functional accessory. This tutorial will guide you through making a chic square-shaped handbag in a vibrant orange color, perfect for a bold and stylish statement. The design is simple, using basic stitches to create a sturdy bag that holds its shape.
Materials You’ll Need
- Yarn: Approximately 200-250 grams of worsted weight (aran/10-ply) or bulky (12-ply) yarn in your chosen shade of orange. Cotton or cotton blends are excellent choices as they provide strength and a nice structure to the bag.
- Crochet Hook: A hook size appropriate for your yarn. A 5.0mm (H/8) or 6.0mm (J/10) hook is recommended for creating a dense fabric.
- Scissors
- Yarn Needle (Tapestry Needle): Essential for weaving in ends and seaming the bag together.
- Stitch Markers: Very helpful for marking corners and the beginning of your rounds.
Key Crochet Stitches and Techniques
- Chain (ch): The foundation of most crochet projects.
- Slip Stitch (sl st): Used to join stitches and finish rounds.
- Single Crochet (sc): A very common and sturdy stitch that creates a tight fabric.
- Working in the Round: The bag will be worked in a continuous spiral, which means you won’t join each round with a slip stitch. This creates a seamless look without a visible seam.
- Invisible Join: A technique used to create a clean, seamless finish when joining.
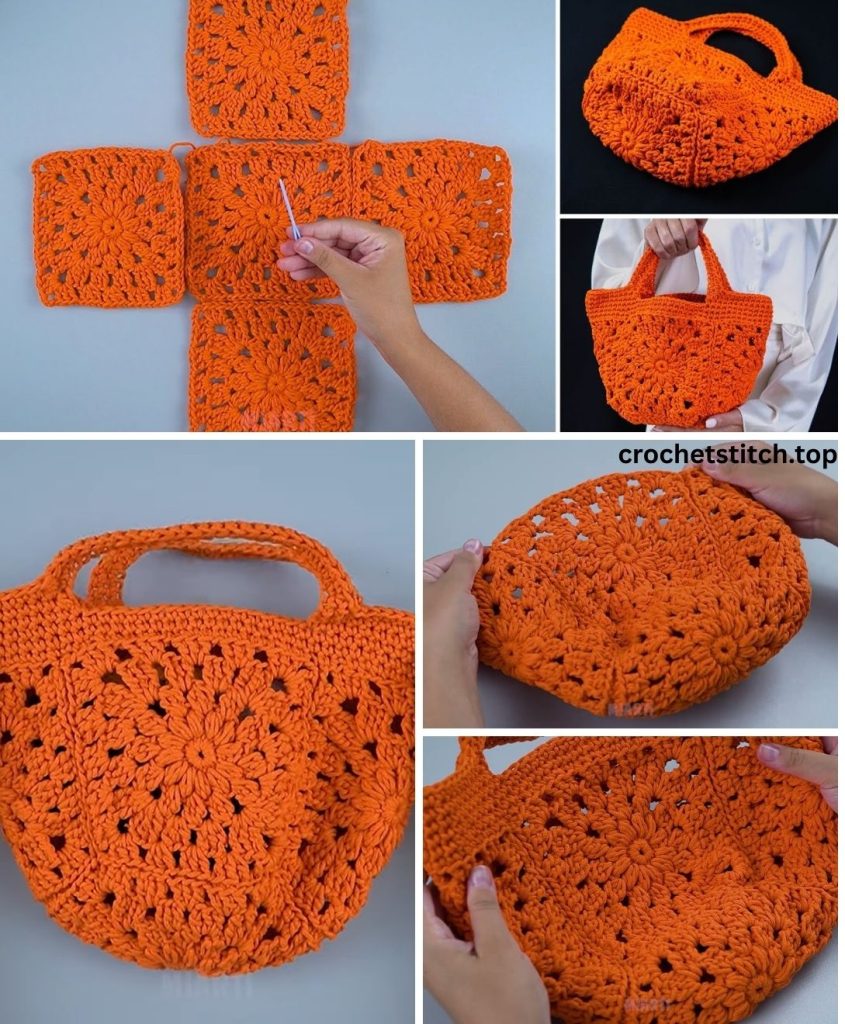
Part 1: Crocheting the Front and Back Panels
The foundation of this bag is two identical square panels. You can either make two large granny squares or use a simple solid square pattern. This tutorial will use the single crochet method for a dense, durable fabric.
- Foundation Chain: Chain 31 (or any number of chains that you want for the width of your bag).
- Row 1: Single crochet (sc) in the second chain from the hook and in each chain across. You will have 30 stitches. Chain 1 and turn.
- Row 2: Sc in each stitch across. Chain 1 and turn.
- Continuing the Square: Continue working rows of single crochet until your square is the same height as its width (e.g., 30 rows for a 30-stitch wide square).
- Repeat: Make a second, identical square panel for the other side of your bag. Fasten off both panels, leaving a long tail on each for seaming.
Part 2: Creating the Side Panel and Base
The side panel and base of the handbag are made from a single long strip of crochet.
- Foundation Chain: Chain a long length, approximately 60-70 chains, which will form the perimeter of your bag (one side, the bottom, and the other side).
- Row 1: Sc in the second chain from the hook and in each chain across. Chain 1 and turn.
- Continuing the Strip: Continue working rows of single crochet until the strip is your desired width (e.g., 3-4 inches). This will be the depth of your handbag. Fasten off, leaving a long tail for sewing.
Part 3: Assembling the Handbag
Now it’s time to bring all your pieces together.
- Lay Out Your Pieces: Lay one square panel flat. Pin or clip the long strip around three sides of the square: one side, the bottom, and the other side.
- Seaming: Using a yarn needle and the long tail, begin to seam the pieces together.
- Whipstitch: The whipstitch is a simple and effective method. Insert your needle from the back to the front through a stitch on the side panel, then through the corresponding stitch on the main square. Repeat this motion, creating a stitch that “whips” over the edges.
- Slip Stitch Join: You can also join with a slip stitch. With the wrong sides facing each other, insert your hook through both layers and slip stitch along the edges.
- Repeat: Once the side and bottom strip is sewn to the first square, repeat the process with the second square panel, sewing it to the other side of the strip.
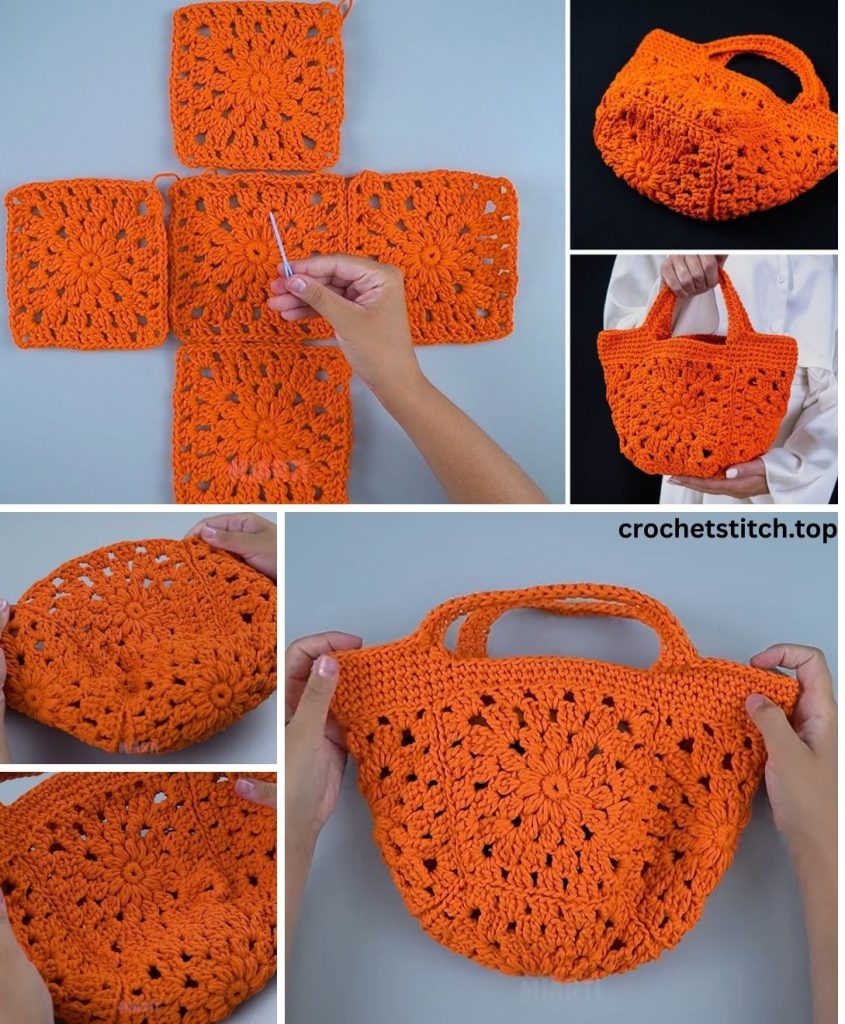
Part 4: Creating and Attaching the Handles
A sturdy handle is crucial for a handbag.
- Crocheting the Handles (Make 2):
- Chain 6.
- Sc in the second chain from the hook and in each chain across (5 sc). Chain 1 and turn.
- Continue working rows of single crochet until your handle is the desired length (for a handbag, 12-18 inches is a good length).
- Fasten off, leaving a long tail for sewing.
- Attaching the Handles:
- Positioning: Lay your bag flat and find the two central points on the front and back where you want to attach your handles. Pin them in place.
- Sewing: Using a yarn needle and a long tail, securely sew the end of one handle to the inside of the bag. Use a strong whipstitch or a running stitch.
- Reinforce: Go over the stitches a second time to ensure the handle is firmly attached and can handle weight.
- Repeat: Sew the other end of the handle to the back of the bag at the corresponding points. Repeat the process for the second handle.
Part 5: The Finishing Touches
- Weaving in All Ends: This is a crucial step for a professional finish. Use your yarn needle to carefully weave in all loose ends on the inside of the bag.
- Optional Lining: If you plan on carrying small items, adding a fabric lining is highly recommended. You can cut a piece of fabric to fit the inside of your handbag, sew it into a bag shape, and hand-sew it to the top rim.
- Blocking (Recommended): Blocking your finished bag will help define the shape and stitches. Simply mist the bag with water, gently shape it, and let it air dry completely.
Congratulations! You have successfully created a durable and stylish square handbag in a beautiful orange color. This project is a wonderful way to create a functional accessory that you can use and enjoy for years to come.